Inspirstar
Profile Editor
For
Inspirstar IS02
Programmable
Microcurrent Stimulator™
User's
Guide
![]()
INSPIRSTAR INC.
Table of Contents
1.2 Install
Inspirstar Profile Editor
1.4 Start
Inspirstar Profile Editor
3.1 Start
Inspirstar Profile Editor
3.4.1 To
Create a New Profile from Scratch
3.4.2 To
Open an Existing Profile
3.4.4 To
Create a Profile from an Existing Profile
3.4.6 To
Copy the contents of Profile to Excel Spreadsheet
3.5 Organize
Protocols in a Profile
3.5.7 To
Cut, Copy and Paste a Protocol
3.5.8 To
Export a Protocol to a File
3.5.9 To
Export All Protocols to a folder
3.5.10 To
Import an Existing Protocol
3.5.11 To
Move a Protocol between Profiles
3.6.1 Make
changes in Profile Editor
3.6.1.1 To
Change the Protocol Name
3.6.1.2 To
Change the Protocol Description
3.6.1.3 To
Turn off the Beep of Protocol
3.6.1.4 To
Change the Output Current Intensity
3.6.1.5 To
Change the Therapy Time
3.6.2 Make
Changes with Protocol Editor
3.6.3 Make
Changes with Global Change
3.7.1 Connect
Inspirstar IS02 to PC
3.7.1.2 Use
the Circular Connector
3.7.2 Read
and Write Profile to IS02
3.7.2.1 Introduction
to Protocols in IS02 Device
3.7.2.2 To
Read Profile from Inspirstar IS02
3.7.2.3 To
Write Profile to Inspirstar IS02
3.7.2.4 To
Erase Profile in Inspirstar IS02
3.7.2.5 To
Append Profile to Inspirstar IS02 Device
3.7.2.6 To
Append one or multiple Protocols
3.7.2.7 To
Remove or Merge Appended protocols
3.7.2.8 To
Read Back Appended protocols
3.7.6 Retrieve
Product Information
3.7.8 Register
Software License
4.3.1 To
Edit a Protocol in a Profile
4.3.2 To
Edit a Standalone Protocol
4.4 Organize
Frequency Pairs in a Protocol
4.4.1 To
Select Frequency Pairs
4.4.2 To
Add a New Frequency Pair
4.4.3 To Remove
Frequency Pairs
4.4.5 To
Cut, Copy and Paste Frequency Pairs
4.4.6 To
Import Frequency Pairs
4.4.7 To
Export Frequency Pairs to a File
4.4.8 To
Move Frequency Pairs between Protocols or Profiles
4.4.9 To
Repeat Frequency Pairs
4.4.10 To
Copy/Paste Contents of Frequency Pairs to/from Excel Spreadsheet
4.4.11 To
Include other protocols
4.4.11.1 To
Include Protocols in the Same Profile.
4.4.11.2 To
Include Existing Protocols in IS02 Device
4.6 Change
Parameters of Frequency Pairs
4.6.2 To
use Random Frequency for F1 or F2
4.6.3 Using
Parameters Editor Panel
4.6.3.1 Parameters
Editor Panel Overview
4.6.3.2 Basic
Parameters Panel
4.6.5 To
Change Default Parameters
4.7 Manage
Predefined Waveforms
4.7.1 To
change parameters to a predefined waveform
4.7.2 To
Show or hide waveform parameters
4.7.3 To
select the parameters in a waveform
4.7.4 To
define a new waveform
4.7.5 Manage
Predefined Waveforms
5.1 Start
Real Time Control Panel
5.4.1 To
Run a Profile in Real Time
5.4.2 To
Run a Protocol in Real Time
5.5 Make
Real Time Changes to Output
5.5.3 To
Change Output Current
6.2.1 To
Apply Encryption to Protocols
6.2.2 To
Remove Encryption from Encrypted Protocols
6.3 To
Use Encrypted Protocols
6.4.1 To
Distribute Authorization Code
6.4.2 To
Distribute USB Authorization Keys
7.2 Remote
Keypad Window Layout
7.3 Operate
with Remote Keypad
8.1 How
to restore Inspirstar IS02 to its factory default profile?
8.2 What
to do if I forgot the password?
8.4 Can
two channels run in different period and phase?
8.5 Can
two channels run in different current intensity?
8.6 How
to turn off the modulating frequency?.
8.7 How
to turn off one channel?
8.8 How
to change the period for all frequency pairs in a protocol?
Table
of Figures
Figure 2 the
Structure of a Therapy Profile
Figure 3 Waveform
and Parameters
Figure 4 Profile
Editor Window
Figure 5 License
Registration Window
Figure 6 Micro-USB cable connection to IS02 (IS02PRO shown)
Figure 7 Connect Circular Connector to Inspirstar IS02BA
Figure 8 Connect 4-Pin Header to Inspirstar IS02AA and IS02BA
Figure 14 Merge
Appended Protocols
Figure 15 Marge
Appended Protocols to Main Profile
Figure 16 Read
Back Appended Protocols
Figure 17 Memory
Configuration
Figure 18 Change
IS02 Settings
Figure 19 Hints
For Communication Problems
Figure 22 License
Registration Window
Figure 25 Real
Time Control Panel
1 Software Installation
1.1 System Requirements
l Supported Operating Systems: Windows Server 2003
SP2; Windows XP SP3; Windows Vista SP1; Windows 7, Windows 8, Windows 10
l Required Software:
Microsoft .NET Framework 4.0 Redistributable Package
Note: The setup.exe
will install the required software in your PC if necessary.
l
Disk Space Requirements: 850 MB (x86), 2 GB (x64)
l
One available USB port
l
CD drive
l
Minimum size of 800x600 for the PC display, 1024x768 or
above recommended
l
Adobe Acrobat Reader for the on-line help documents.
1.2 Install Inspirstar Profile Editor
1.
Insert the CD-ROM to the CD drive of the PC. The setup
for Inspirstar Profile Editor shall start.
2.
If the setup does not start automatically, you can run
the setup.exe by double clicking the setup.exe in the root directory of the
CD-ROM.
3.
Follow the instructions in Setup window to finish the
installation.
NOTE
If
you do not have Microsoft .NET Framework v4.0 installed in your PC, you will be
prompted to install the .NET Framework first. Then the installer will guide you
to install Profile Editor.
1.3 Install USB Device Driver
You
need to install the Windows device driver for Inspirstar IS02 or the Inspirstar
USB adaptor. You can use one of the following methods to install the driver.
Install From Inspirstar Folder
Click the "USB Driver\Install USB
Driverr" from Inspirstar��s program folder. The folder is accessed from Windows
Start -> All Programs -> Inspirstar.
Install from Profile Editor
Start Inspirstar Profile Editor from
desktop or start menu, click on menu Tools -> Install USB Driver to start
the installation.
After
a successful installation of the driver, your computer will have a new serial
port (COM) when Inspirstar IS02 or the Inspirstar USB Adaptor is inserted into a
USB port of the PC.
1.4 Start Inspirstar Profile Editor
You
can start Inspirstar Profile Editor from Start -> All Programs ->
Inspirstar, if the default installation folder was used.
You
will be prompted to enter the license key at the first time when you start the
Profile Editor.
If
you don��t have a license key, click button ![]() to Inspirstar or your distributor for a
license key. You need to provide the Installation code shown on the screen for
the license key.
to Inspirstar or your distributor for a
license key. You need to provide the Installation code shown on the screen for
the license key.
After
you receive the license key, enter the user name and license key into the boxes
and click ![]()
To ensure to enter
the license key accurately, copy the license key in the email then click ![]()
After
the license key is registered, you can register another key for another feature
or continue by click button ![]() .
.
1.5 Software Update
Inspirstar Profile Editor connects to the Internet to check for available software updates and product news. If you are prompted for network access permission, please allow the access of the internet. The software does not send any information to the internet server.
2
Introduction and Concepts
2.1 Profile Work Flow
Inspirstar
Profile Editor does one main task: to program protocols into Inspirstar IS02 Programmable
Microcurrent Stimulator™ (PMS). The workflow is straight forward as illustrated
in Figure 1 Profile
Work Flow.

Figure 1 Profile Work Flow
2.2 Therapy Profiles
Inspirstar
IS02 supports two therapy profiles: factory profile and user profile. The Factory
Profile holds five factory therapy protocols that have been pre-programmed into
Inspirstar IS02. The User Profile holds five or more user therapy protocols.
Each therapy protocol has one or more frequency pairs. When you program an Inspirstar
IS02, you are writing therapy protocols into the user profile in the Inspirstar
IS02. If the protocol in the user profile is valid, Inspirstar IS02 will use
the user protocol instead of the factory protocol. See Figure 2 the Structure of a Therapy Profile.
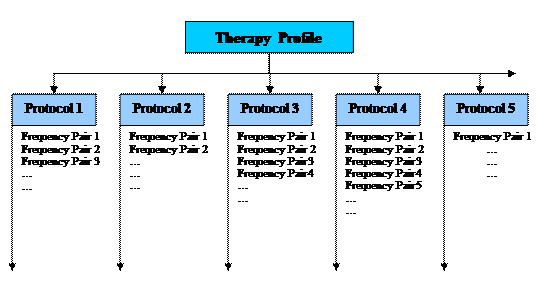
Figure 2 the Structure of a Therapy Profile
2.3 Therapy Protocols
2.3.1 Frequency pairs
A
therapy protocol has one or more frequency pairs. Each frequency pair defines
the frequency, current intensity, and other parameters of the output waveform of
the two output channels. The therapy time of a protocol is the total therapy time
of all frequency pairs of the protocol. The frequency pairs will be executed in
sequence when a protocol is started.
2.3.2 Waveform and Parameters
Inspirstar IS02 outputs current pulses.
The waveform and parameters is illustrated in Figure 3 Waveform and Parameters. Both channels have the
parameters marked on the CH1 waveform (at the top).
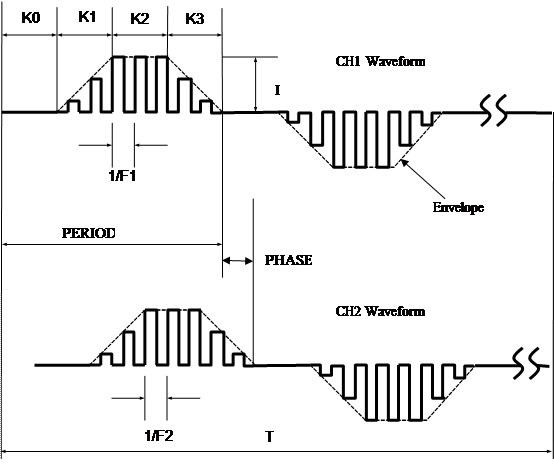
Figure 3 Waveform and Parameters
PERIOD:
Period of the modulated pulse. The pulse can be modulated by the carrier
frequency F. The period is programmable from 4 ms to 60000 ms. The outline of
the waveform is often referred to as the envelope of the waveform, when the
pulse is modulated, as shown in dotted lines in the figure.
F: frequency of the carrier,
also called chopper frequency.
T: Therapy time in minutes,
programmable from 1 minute to 60 minutes for each frequency pair. The waveform
will be repeated during the therapy time.
I: peak current intensity of the pulse,
expressed in ��A.
K:
duty cycle of the waveform. The pulse is composed of four segments for their
nature in the waveform.
K0:
off period, there is no output current at this period, or i=0.
K1:
current ramp up period, current ramps up to the peak current intensity I from 0
��A.
K3:
current ramp down period, current ramps down from the peak current intensity I
to 0 ��A.
Each segment is programmable
from 0% to 100% of the period of the envelope. When a period has 0% duty, the
period will be eliminated.
Polarity: the polarity of the pulse is programmable to be
alternative, always positive, or always negative. In alternative mode, the
output polarity will change the polarity.
Phase:
is the relationship of the waveforms of the two channels. Channel 1 is used as
the reference. A phase of 180 degrees equals to one period of channel 1. The
phase of Channel 2 determines the time of the start point of the period of
channel 2. When phase is 0 degree, the waveform of channel 2 is aligned with
the waveform of channel 1. When the phase is 180 degrees, the waveform of
channel 2 starts one period later than CH1.
HINT
Examples
are provided to demonstrate how the parameters can be used in a protocol. To open
��Waveform Examples.profile��, use menu File -> Open Examples in Profile
Editor window.
3 Profile Editor
3.1 Start Inspirstar Profile Editor
To start
the Inspirstar Profile Editor,
- Click Windows Start
-> All Programs -> Inspirstar -> Profile Editor.
- Or browse to a profile
file in Windows Explorer, double click on the file with extension
.profile.
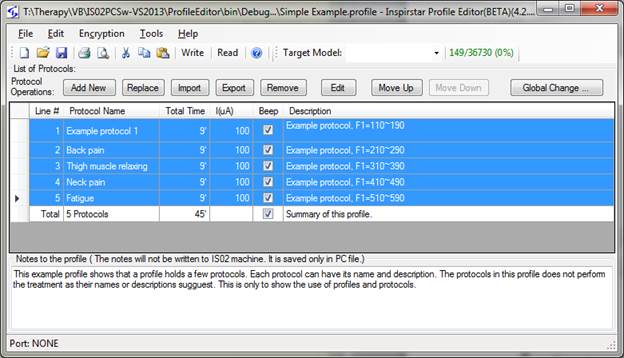
3.2 Window Layout
The window
of Inspirstar Profile Editor is shown in the following picture. The window is
organized in five areas. Explanation of the areas is as follows from the top to
the bottom of the window.

Figure 4 Profile Editor Window
Menus and Tool Bars
You
can use the menus and tool bars to perform actions on profiles and protocols.
More explanation on menus and tool bars can be found in section 3.8 Menus and Tool Bars on page 54.
Protocol Operation Tools
Most
frequently used tools for protocols manipulation are shown above the protocol
list.
Protocols List
The protocols
in the profile are listed in the box. The values in some cells in the table can
be changed directly in the table.
Notes to the Profile
The notes
can include any useful information related to this profile and protocols in it.
The notes will not be written to IS02. It is saved only in PC file.
Status Bar
The
bottom of the window features a status bar to show you the status of the
profile, such as the COM port that is used to connect to Inspirstar IS02, and
other informative messages.
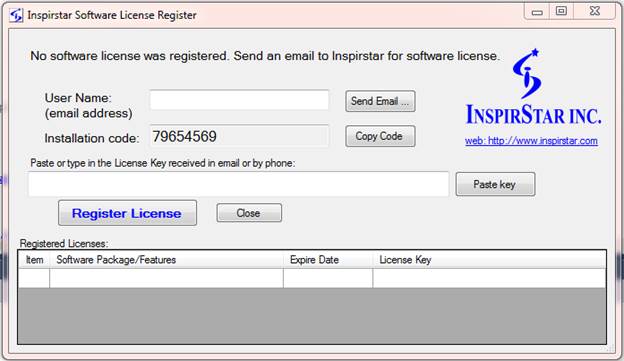
3.3 Register Software License
To
register a license for a new software feature, or to check existing software
license, use menu Help -> Register License, the following window will pop
up. The window will pop up when you try to use a feature that you don��t have a
license.

Figure 5 License Registration Window
If you don��t have
a license or want to purchase a new license, click on button ![]() ,
your email client software will pop up with a email draft to sales@inspirstar.com.
The user name and the installation code is populated in the email body. You can
add some other information then send the email for a software license.
,
your email client software will pop up with a email draft to sales@inspirstar.com.
The user name and the installation code is populated in the email body. You can
add some other information then send the email for a software license.
3.4 Start with a Profile
A therapy profile can be started from
several sources for editing.
3.4.1 To Create a New Profile from Scratch
Use the menu command File
-> New Profile; or click on the New Profile icon ![]() on the tool bar, to start a blank profile.
The blank profile has 5 blank protocols added automatically.
on the tool bar, to start a blank profile.
The blank profile has 5 blank protocols added automatically.
3.4.2 To Open an Existing Profile
Use the menu command File
-> Open Profile; or click the Open Profile icon ![]() on the tool bar, to load an existing
profile.
on the tool bar, to load an existing
profile.
3.4.3 To Save a Profile
Use
the menu command File -> Save Profile; or click the Save Profile icon ![]() on the tool bar, to save the current profile.
on the tool bar, to save the current profile.
To
save the profile to a different name, use the menu command File -> Save
Profile As, and give a different name for the file.
3.4.4 To Create a Profile from an Existing Profile
To create a profile from the protocols in current profile, use menu command File -> Create Profile From, the following dialog will pop up.
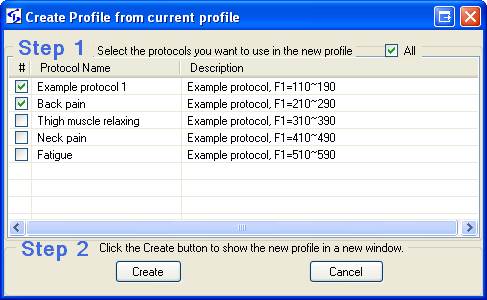
Check the box before the protocols to select the protocols you want in the new profile, then click Create, a new profile will be created with the selected protocols.
3.4.5 To Print a Profile
To print the current
profile, use menu command File -> Print or tool bar button![]() ,
the Print dialog will pop up.
,
the Print dialog will pop up.
To Preview the print of
current profile, use menu command File -> Print Preview or tool bar button ![]() ,
the Print Preview window will show up. By default, only the details of
protocols are not printed.
,
the Print Preview window will show up. By default, only the details of
protocols are not printed.
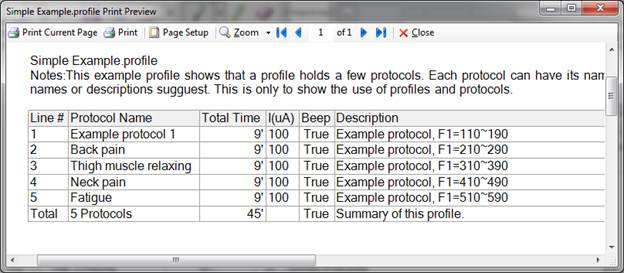
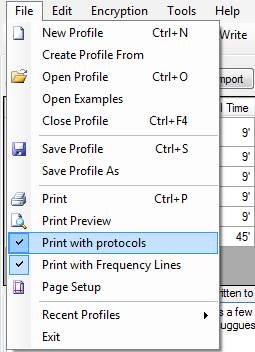
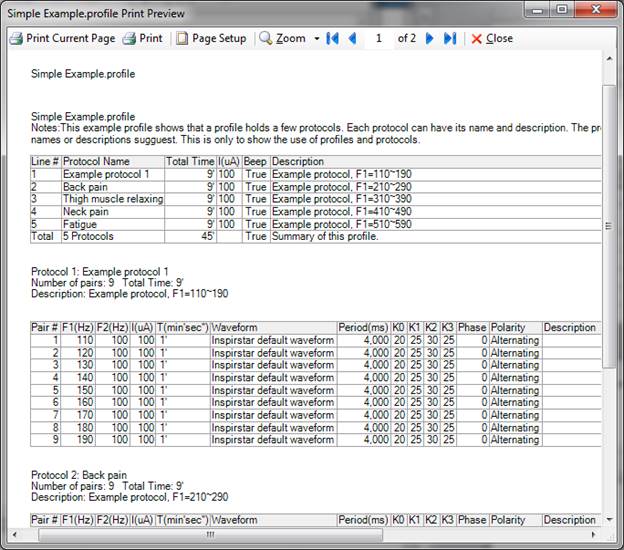
To
print the profile with details of protocols, check the menu item File ->
Print with Protocols.
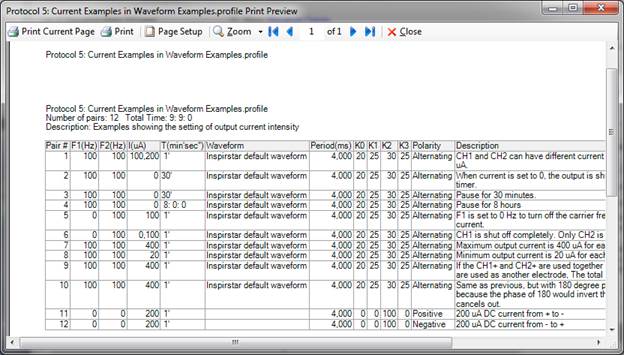
The
details of protocols will be printed after the summary of the profile as
illustrated below.
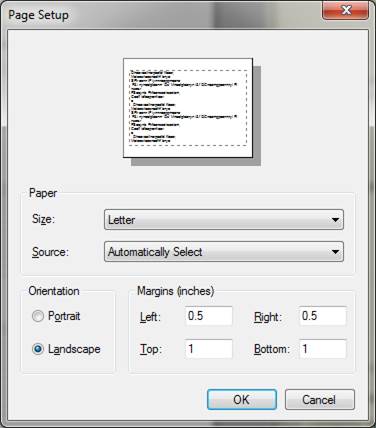
To change the orientation of the page, or adjust the margins on page, click on menu File -> Page Setup or click on the Page Setup button on the Print Preview window.

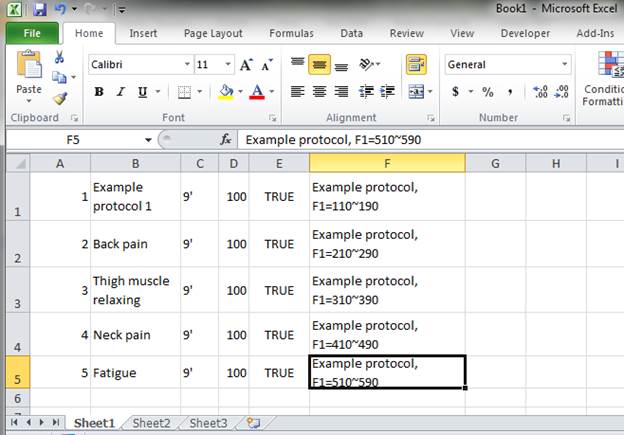
3.4.6 To Copy the contents of Profile to Excel Spreadsheet
To
copy the contents of the Profile as displayed on Profile Editor to Excel
spreadsheet, select the cells to be copied, then use the Copy button on tool
bar or press Ctrl+C. Do
not click the row header for selection. Selecting by row header will select the
protocols, not the cell contents.
Paste
the contents into Excel spreadsheet
3.5 Organize Protocols in a Profile
The
protocols in the profile are listed in the table in the Profile Editor Window.
Operations are provided to help organizing the protocols in the profile.
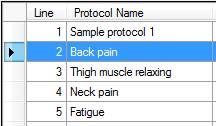
3.5.1 To Select Protocols
All protocols in the profile are listed
in the List of Protocols table. You can select one protocol or multiple
protocols for edit operations such as cut, copy, move and export. Selected protocols
are highlighted.
|
|
l To select one protocol, click
the row header of
the protocol. The selected row becomes current
row and is marked with an arrow. |
|
|
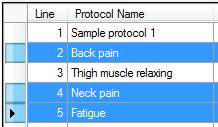
l To select multiple protocols
in consecutive range, click the row header of the first protocol with the
left mouse button, then hold down the SHIFT
key on the keyboard, and then click the row header of another protocol in the
list. The protocols between the two clicks will be selected. |
|
|
l To select multiple protocols
in scattered locations, hold down the CTRL
key on the keyboard, then click the row headers of the protocols you want to
select. |
|
|
l To select all protocols in
the list, use menu command Edit -> Select All; or press CTRL+A. |

3.5.2 To Add a Blank Protocol
To add a blank protocol into the profile,
- Click on tool bar
button
 , the blank protocol will be
added after the current row.
, the blank protocol will be
added after the current row. - Or Press Insert key, the blank protocol will be added after the current row.
- Or Press Ctrl + ��+�� key, the blank protocol will be added after the current row.
3.5.3 To Remove a Protocol
To remove a protocol from the profile,
- Select the protocol to
be removed, click on tool bar button
 , the selected protocol will
be removed from the profile.
, the selected protocol will
be removed from the profile. - Or select the protocol to be removed, Press Delete key, the selected protocol will be removed from the profile.
NOTE
If
the protocol to be removed is not blank, you are prompted to confirm the
operation.
3.5.4 To Replace a Protocol
You can replace a protocol in the profile with a protocol in a protocol file. Or replace a protocol with multiple protocols from a profile,
- Select the protocol to
be replaced in the profile, click on tool bar button
 , then browse to select a
protocol file or select a profile file and select OK. The protocols in the
protocol or profile file will replace the selected protocol.
, then browse to select a
protocol file or select a profile file and select OK. The protocols in the
protocol or profile file will replace the selected protocol.
NOTE
You will be prompted to confirm to replace a protocol that has been changed but not saved.
You won��t be prompted to confirm the operation even if the protocol to be replaced is not blank but saved.
Empty protocols after the selected protocol will be replaced if the profile contains multiple protocols.
A protocol being included by another protocol won��t be removed with the Replace operation.
3.5.5 To Move a Protocol
The protocols in the profile can be moved up and down to your desire. The IS02 machine uses protocol number to refer to a certain protocol so the locations of protocol in the profile is important. To move a protocol in the profile,
- Click the row header to select a single protocol or multiple protocols in the profile.
- Click on tool button
 to move the selected protocols up by
one line, or button
to move the selected protocols up by
one line, or button  to move the selected protocols down
by one line.
to move the selected protocols down
by one line.
Another way to move a protocol is through the Cut and Paste features. This allows you to move a protocol within a profile, or between two profiles.
NOTE
If
you did not give a name to the protocols, the protocols will be named as
��Protocol #�� where # is the line number of the protocol. After the protocol is
moved up or down, the moved protocol will have a new number. If all protocols
have numbers as the name, it would be hard to distinguish if the protocol has
been moved. It��s recommended to give a name to each protocol.
3.5.6 To Sort Protocols
The protocols in the profile can be sorted in Profile Editor for display purpose. Click the column header to sort protocols for that property in ascend and descent order.

NOTE
The sorting is for display only. The
actual order is not changed unless you Renumber all the protocols. Click the right
mouse button on the protocol list to either Renumber the protocols as in the
displayed order or unsort all the protocols in their storage order in the profile.
3.5.7 To Cut, Copy and Paste a Protocol
The protocols in the profile can be moved up and down to your desire. The IS02 machine uses protocol number to refer to a certain protocol so the locations of protocol in the profile is important. To move a protocol in the profile,
- Click the row header to select a single protocol or multiple protocols in the profile.
- Click on tool button
 , or press Ctrl-X to cut the
selected protocols off the profile. The selected protocols will be removed
from the profile to the Windows clipboard.
, or press Ctrl-X to cut the
selected protocols off the profile. The selected protocols will be removed
from the profile to the Windows clipboard. - Click on tool button
 , or press Ctrl-C to copy the
selected protocols. The selected protocols will be copied to the Windows
clipboard.
, or press Ctrl-C to copy the
selected protocols. The selected protocols will be copied to the Windows
clipboard. - Click on tool button
 , or press Ctrl-V to paste
protocols from Windows clipboard into the profile.
, or press Ctrl-V to paste
protocols from Windows clipboard into the profile.
3.5.8 To Export a Protocol to a File
You can export a protocol in the profile to a protocol file in disks for other uses. To export a protocol,
- Click the row header to select a protocol in the profile.
- Click on tool button
 , a file browsing dialog
opens up. Browse to the folder and give a name for the protocol file. By
default, the protocol name is used as the protocol file name.
, a file browsing dialog
opens up. Browse to the folder and give a name for the protocol file. By
default, the protocol name is used as the protocol file name. - Click SAVE to save the protocol file.
3.5.9 To Export All Protocols to a folder
You can export all protocol in the profile to a folder in disks. To export a protocols,
- Click the row header to select more than two protocols in the profile. To select all protocols, click on the top left corner of the table.
- Click on tool button , a file browsing dialog
opens up. Browse to a folder to hold all the protocols. By default, the
profile name is used as the folder name.
- Click SAVE to start exporting all protocols to files. Exported protocols will be numbered in the same order as they are in the profile and will be named with their protocol name.
3.5.10 To Import an Existing Protocol
If you have got protocol files in disk, you can import them into the profile. To import an existing protocol into the profile,
- Click on tool bar
button
 , then browse to select an
existing protocol file and select OK. The protocol in the protocol file
will be imported to the profile after the current line, i.e. the operation
is ��insert after��.
, then browse to select an
existing protocol file and select OK. The protocol in the protocol file
will be imported to the profile after the current line, i.e. the operation
is ��insert after��. - Drag-Drop operation: use the Windows Explorer to browse to the protocol file or profile file to be imported, hold the mouse button to drag the file into the Profile Editor window, and then drop the file into the List of Protocols. The protocol in the dragged file will be imported at the insertion point that was highlighted by a red line.
NOTE
You can import a protocol file, or a profile that contains multiple protocols. When the file contains multiple protocols, all protocols will be imported in the same sequence as in the existing profile file.
TIP
You can add a recently used protocol file by right click the table and select a file in the list.
3.5.11 To Move a Protocol between Profiles
To move or duplicate a protocol to another profile, you can choice the following methods.
Through Cut, Copy and
Paste:
- Click the row header to select a single protocol or multiple protocols in the first profile.
- Click on tool button , or press Ctrl-C to copy the
selected protocols. The selected protocols will be copied to the Windows
clipboard.
- Open another profile or start a new profile.
- Click on tool button , or press Ctrl-V to paste
the protocols from Windows clipboard into the profile.
Through Drag and Drop:
- Click the row header to select a single protocol in the first profile.
- Hold down the left mouse button and move the mouse pointer to the new profile window.
- The new profile window will display a red line to indicate the insertion point.
- Use the Ctrl key to change to move or to copy the protocols.
- Release the mouse button. The protocols are dragged will be dropped to the new profile window.
Through Export and Import:
- Click the row header to select a single protocol in the first profile.
- Click on tool button , or press Ctrl-E to export
the selected protocol to a disk file.
- Open another profile or start a new profile.
- Click on tool button
 , or press Ctrl-I to import
the protocol file which was exported from the previous step.
, or press Ctrl-I to import
the protocol file which was exported from the previous step.
NOTE
You
can open two Profile Editor windows and copy and paste protocols between the
two profiles.
3.6 Change a Protocol
3.6.1 Make changes in Profile Editor
The information of each protocol listed in the table can be changed. The information is: Protocol Name, Protocol Description, Protocol Total Time, Protocol Output Current Intensity and the option to beep at the end of protocol.
3.6.1.1 To Change the Protocol Name
- Click to select the cell under column header of ��protocol name�� of the row of the protocol.
- Type in the new name;
- Or press F2 to edit the name;
- After it��s done, press Enter or move the cursor to another cell in the table. The name of the protocol has been changed.
NOTE
The protocol name can also be assigned
or changed in the Protocol Editor window.
3.6.1.2 To Change the Protocol Description
- Click to select the cell under column header of ��Description�� of the row of the protocol.
- Type in the new description;
- Or press F2 to edit the description;
- After it��s done, press Enter or move the cursor to another cell in the table. The description of the protocol has been changed.
NOTE
When the profile is written into IS02
machine, the description of the protocol will be truncated to 255 characters,
although the limit for the description in the disk file is much longer.
3.6.1.3 To Turn off the Beep of Protocol
The beep that sounds at the end of the protocol running in IS02 machine can be turned off.
- Click to uncheck the box under column header of ��Beep�� of the row of the protocol.
- Or click to uncheck the box under column header of ��Beep�� of the last row (the Total line) to make changes to all the protocols.
NOTE
The beep option can only be changed in
Profile Editor window.
3.6.1.4 To Change the Output Current Intensity
To change the output current intensity of a single protocol:
- Click to select the cell under column header of ��I(uA)�� of the row of the protocol.
- Type in the new value for the current;
- Or press F2 to edit the value of the current;
- After it��s done, press Enter or move the cursor to another cell in the table. The output current intensity of the protocol has been changed.
To change the output current intensity of all protocols in the profile:
- Click to select the cell under column header of ��I(uA)�� of the last row (the Total line).
- Type in the new value for the current.
- After it��s done, press Enter or move the cursor to another cell in the table. The output current intensity of all protocol in the profile have been changed.
NOTE
When the current is changed with this
way in Profile windows, all waveforms of both channels in the protocol will
have the same current intensity. In order to achieve non-uniform current
intensity for waveforms. you need to use the Protocol Editor window to make the
changes.
3.6.1.5 To Change the Therapy Time
To change the therapy time of a protocol:
- Click to select the cell under column header of ��Total Time�� of the row of the protocol.
- Type in the new value for the therapy time.
- Or press F2 to edit the value of the therapy time.
- After it��s done, press Enter or move the cursor to another cell in the table. The therapy time of the protocol has been changed.
NOTE
The time can be entered in different
format. Below are valid formats:
|
Entered |
Interpreted as |
|
1��20�� |
1 minute 20 seconds |
|
1:20 |
1 minute 20 seconds |
|
1:20:30 |
1 hour 20 minutes 30 seconds |
|
1 |
1 minute |
|
20�� |
20 seconds |
NOTE
Because the therapy time of a protocol
is the total time of all frequency pairs in the protocols, the change will be
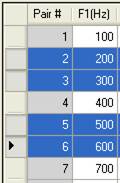
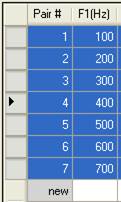
made to all frequency pairs proportionally. For example, a protocol has 12
minutes of therapy time from these frequency pairs:
After the therapy time is changed to 15
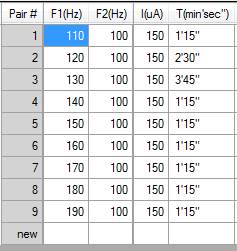
minutes with this method, all frequency pairs in the protocol will have new
time as shown below. The new time for each frequency pair equals the old time x
15/12, or 1 minute will becomes 1 minute and 15 seconds.
3.6.2 Make Changes with Protocol Editor
To make changes to waveform parameters such as frequency, polarity, duty cycle, etc, you need to use Protocol Editor. To bring up the Protocol Editor window,
- Click to select a protocol for editing.
- Click on tool button
 , or double click the line of
the protocol, the Protocol Editor window will pop up. See 4 Protocol Editor for more details.
, or double click the line of
the protocol, the Protocol Editor window will pop up. See 4 Protocol Editor for more details. - The title of the Protocol Editor shows the protocol number in the profile and the protocol name.
![]()
- You can click on the Previous button on the tool bar to edit the previous or next protocol in the profile; or entering the new protocol number to jump to protocol.
![]()
- when you are done, close the Protocol Editor window.
3.6.3 Make Changes with Global Change
You can change the parameters of the frequency pairs to all or some protocols of the profile:
- Click
 to bring up the Global Change
window.
to bring up the Global Change
window.
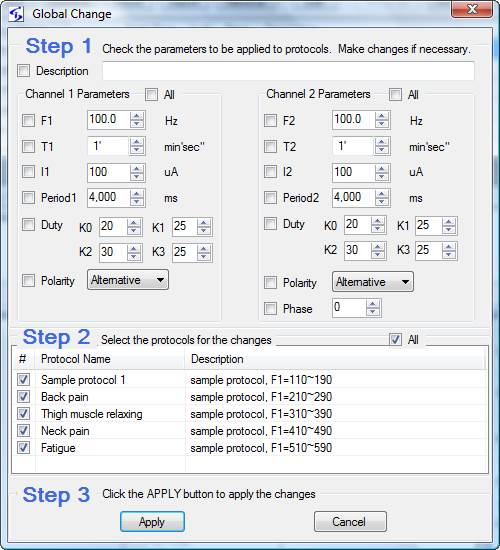
- In Step 1, check the boxes of the parameters that you want to change and change the values;
- In Step 2, check the protocols that you want to apply the new values to.
- Click
 to apply the changes to the selected
protocols.
to apply the changes to the selected
protocols.
NOTE
It
would be easier to change parameters in all protocols from the parameters of a
frequency pair if you use the Global Change from the Protocol Editor. See 4.6.4 Using Global Change for details.
3.7 Work with IS02
3.7.1 Connect Inspirstar IS02 to PC
You
need a spare USB port on your computer for Inspirstar USB adaptor. The
Inspirstar USB Adaptor can be used with either 4-pin connector or circular
connector to connect to Inspirstar IS02. Plug the USB connector of the adaptor
into the USB port on your PC, as shown in the following picture.

CAUTION
Use
only the Inspirstar USB Adaptor. Using other USB adaptors or converters will
not work and may damage devices.
3.7.1.1 Use USB Connector
Newer IS02 models including IS02LCD, IS02PRO and IS02BAs use micro-USB connector for PC connection. Plug in a micro-USB data cable into the USB port on the rear side of. Note some micro-USB cables are for charge only and can��t be used for communication.

Figure 6 Micro-USB cable connection to IS02
(IS02PRO shown)
3.7.1.2 Use the Circular Connector
The
circular connector is available on IS02BA. The circular connector is called
miniature DIN circular connector, or most of times mini DIN for short. It has
the same shape as S-video connector, or PS/2 mouse/keyboard connector. Insert
the circular connector into the COMM port on the top side output panel, and
connect the DB9 connector of the other end of the cable to Inspirstar USB
Adaptor, as shown in the following pictures.

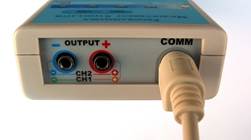
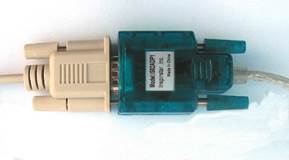
Figure 7 Connect Circular Connector to Inspirstar IS02BA
3.7.1.3 Use the 4-pin Header
The
connection to Inspirstar IS02AA and IS02BA is through the connection holes in
the battery compartment. Open the battery compartment of Inspirstar IS02AA/BA,
remove the batteries, you will see four holes in line at the center of the
battery compartment. Align the four pin header from Inspirstar USB adaptor to
the four holes; insert the header vertically and firmly with care. See the
following pictures. The LED above key 1 will be flashing after the header is
properly inserted. The other end of the 4-pin cable needs to be connected to
the Inspirstar USB Adaptor, as shown in the following pictures.
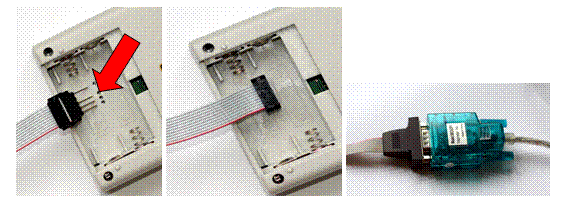
Figure 8 Connect 4-Pin Header to Inspirstar IS02AA and IS02BA
CAUTION
Please
keep the 4-pin header away from metal surfaces to avoid short to the USB power.
If you see a power failure message on your
Windows, you need to unplug the USB plug from your PC and then re-insert it to
recover from the failure.
3.7.2 Read and Write Profile to IS02
3.7.2.1 Introduction to Protocols in IS02 Device
The protocols in a profile can be written to IS02 device or to be read back. When a profile is written (programmed) into a IS02 device, the profile is referred as User Profile or Main User Profile to the device.
The Main User Profile can be protected from unauthorized read back with a password when the profile is written to the device.
More protocols can be appended to the existing Main User Profile for IS02LCD, IS02PRO and other IS02 devices that can hold more than 99 protocols. These Appended Protocols are not protected with the readback password. The Appended Protocols can be merged into the Main User Profile to be password protected.
The following is a summary of the operations related to write or read back protocols with IS02 devices.
|
Operation |
Main User Profile will be |
Appended Protocols will be |
|
Over written with the new profile Password protected if a password is provided |
Cleared (0 appended protocols) |
|
|
Read back if no password or password provided |
Read back along with the main user profile |
|
|
Cleared |
Cleared |
|
|
No change |
Increased with the protocols in the profile |
|
|
No change |
Increased with the selected protocols in the profile |
|
|
Grown with the appended protocols |
Merged into Main User Profile |
|
|
No change |
Cleared (0 appended protocols) |
|
|
Not read back, with or without password |
Read back without the need for the password |
3.7.2.2 To Read Profile from Inspirstar IS02
Note
You need to connect Inspirstar IS02 to
the PC before you start Read Profile. See ��3.7.1
Connect Inspirstar IS02 to
PC��
on how to make the connection.
In Profile Editor Window, use
the command ��Read From���� in Tools menu to read the profile in an Inspirstar
IS02; or click the ![]() button on the tool bar. The following
dialog will show up.
button on the tool bar. The following
dialog will show up.
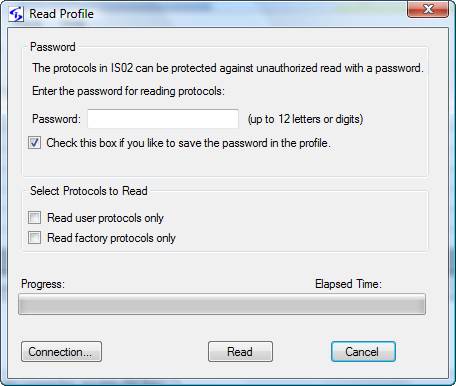
Figure 9 Read Profile
Password:
If the user profile was written into Inspirstar IS02 with a password, the same
password is required for reading the user profile. You have the option to save
the password in the profile. You don��t need to provide the password if you just
want to read factory protocols (see options below).
Select
Protocols to Read: You have the option to
select the protocols to be read into the profile. By default, both checkbox for
user protocols and factory protocols are cleared. This means that the five
protocols in the profile will be either a user protocol, if there is one, or a
factory protocol, if the user protocol is empty. You can select to read either
only the user protocols or only the factory protocols by checking these two
options.
Read:
Click the ![]() button to start the read operation. The
dialog will be closed and the profile will be displayed in Inspirstar Profile
Editor window for viewing or changing.
button to start the read operation. The
dialog will be closed and the profile will be displayed in Inspirstar Profile
Editor window for viewing or changing.
Connection:
invokes the Communication Setup window.
3.7.2.3 To Write Profile to Inspirstar IS02
In Profile Editor Window, use the
command ��Write to���� in Tools menu to write the profile to Inspirstar IS02; or
click the ![]() button on the tool bar. The following
dialog will show up.
button on the tool bar. The following
dialog will show up.

Figure 10 Write Profile
Password:
If you want to protect your protocols in Inspirstar IS02, you can provide a
password in the password box. You have the option to save the password in the
profile.
Programming
Information: If you have a Inspirstar
IS02 model IS02BA or later, you can configure the memory so your profile can
fit into.
![]() :
to detect the model connected to the PC and retrieve the current memory
configuration.
:
to detect the model connected to the PC and retrieve the current memory
configuration.
![]() to invoke the memory configuration window
so you can change the memory size to fit your protocol.
to invoke the memory configuration window
so you can change the memory size to fit your protocol.
Write
protocols with description: When checked, the description
of the protocols and the description of the frequency pairs will be written
into IS02. If your protocol does not fit into IS02 memory, unchecked this box.
Note that the description of the profile is not written into IS02 regardless of
this setting.
Clear
the batch protocols in IS02: When checked, the slots of
the batch protocols in IS02 device will be cleared when the new profile is
written. If the batch protocols is not cleared, the protocol numbers that were programmed
with the previous therapy profile in the batch protocols may refer to totally
different protocols after the new therapy profile is written into IS02.
![]() to setup the communication connection.
to setup the communication connection.
Write:
Click the ![]() button to start the write operation. The
dialog will be closed after the profile is written into Inspirstar IS02 successfully.
button to start the write operation. The
dialog will be closed after the profile is written into Inspirstar IS02 successfully.
Note
Anytime when the
��Write�� operation is executed, all 5 protocols in this profile are written into
the units and the 5 old protocols in the units are replaced.
3.7.2.4 To Erase Profile in Inspirstar IS02
In Profile Editor Window, use menu Tools
-> Erase Profile In IS02�� to bring up the following dialog, then click the ![]() button to erase the user profile in IS02.
button to erase the user profile in IS02.
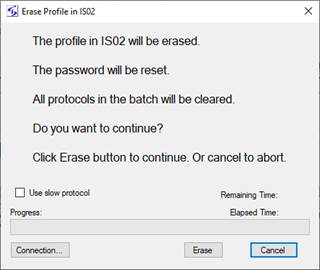
Figure 11 Erase Profile
This feature will erase the user profile regardless whether it is password protected.
3.7.2.5 To Append Profile to Inspirstar IS02 Device
![]()
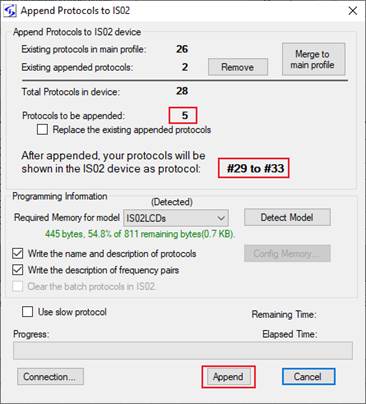
Figure 12 Append Profile
Note
To replace the existing appended protocols with the protocols,
check the box for ��Replace the existing appended protocols��.
3.7.2.6 To Append one or multiple Protocols
To
append one or multiple protocols in the profile to IS02 device, select the
protocol then right click to see the context menu and select Append Protocols,
select Append to complete the operation.
Figure 13 Append Protocols
NOTE
If a protocol has included other protocols in the profile, the included protocols must be also selected for Append operation. In the following example, protocol 6 has included protocol 1, both protocols need to be selected (hint: press down Ctrl then click the protocol line to select multiple protocols).
NOTE
You can include to run existing protocols in IS02 device. Refer to section 4.4.11.2 ��To Include Existing Protocols in IS02 Device�� on page 73 for details.
3.7.2.7 To Remove or Merge Appended protocols
In
Profile Editor Window, use menu Tools -> Append Profile to IS02��, or click the Append button on the tool
bar, to bring up the Append Protocols dialog.
- Click the Remove button to remove
the existing appended protocols from the IS02 device.
- Click the Merge button to merge the
existing appended protocols to the mail profile in the IS02 device.
- After removed or merged, the
appended protocols in the IS02 device will becomes 0.
- Click Cancel to close the dialog
after removing or merging.
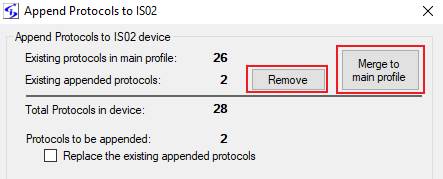
Figure 14 Merge Appended Protocols
To merge the appended protocols to the main profile, provide the existing password of the main profile in the IS02 device if you have the password, or leave the password empty if there is no existing password.
You can also merge your protocols into the main profile even if you don��t have the existing password. Check the boxes to confirm the operation that you understand that you won��t be able to read back the protocols after merge without the password, and you still want to continue the merge operation.
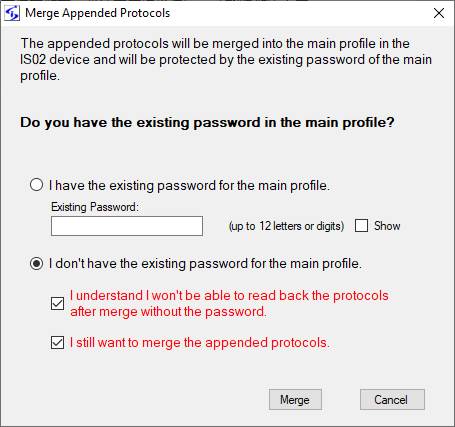
Figure 15 Marge Appended Protocols to Main Profile
3.7.2.8 To Read Back Appended protocols
To
read back the appended protocols from the IS02 device, use menu Tools -> Read
Profile, or click the Read button on the tool bar, to bring up Read Profile dialog.
Check
the box to Read only the appended protocols and click Read to finished the read
back.
This
option can be used when you want to read only the appended protocols for a
shorter read time or when you don��t have the password for the main profile so
you can��t retrieve the main profile but you still can read back the appended
protocols.
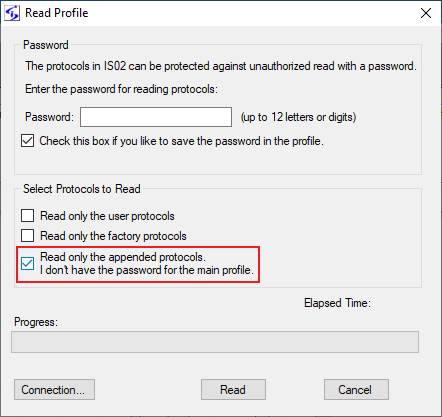
Figure 16 Read Back Appended Protocols
3.7.3 Configure Memory
You can configure the memory in
Inspirstar IS02 model IS02 to fit your profile. In Main Window, use command ��Memory
Configuration�� from Tools menu, or click the ![]() button in the Write Profile widow to
invoke this window:
button in the Write Profile widow to
invoke this window:

Figure 17 Memory Configuration
![]() :
If an Inspirstar IS02 is connected to the PC when the Memory Configuration is
invoked, the memory configuration in the IS02 will be displayed on the window,
and is marked as ��(Detected)��. You can click button ��Detect Model�� to refresh
or detect the model and memory configuration of IS02.
:
If an Inspirstar IS02 is connected to the PC when the Memory Configuration is
invoked, the memory configuration in the IS02 will be displayed on the window,
and is marked as ��(Detected)��. You can click button ��Detect Model�� to refresh
or detect the model and memory configuration of IS02.
Move the slider to add extra memory for
protocols. The total memory capacity for protocols and for logbook is shown on
the screen. Click the Apply button to write the new memory configuration into
IS02.
3.7.4 Change IS02 Settings
Use menu command Tools -> Change IS02 Settings to bring up the following dialog. These settings are for the whole machine and will be applied to all protocols.

Figure 18 Change IS02 Settings
You can change the following options to IS02BA, IS02LCD and IS02PRO.
Ø General Settings:
�� Short beep on key press
When checked, there will be a short beep when a key is pressed on IS02.
�� Supports 10 Protocols
When checked, IS02BA will allow the user to select and run protocol 6 to protocol 10, if the protocols are programmed in the machine. This option is applicable to IS02BA only.
�� Enables audible alert on the loss of output connection during protocol running
Short beeping sounds will be raised to remind the user to check the output connections when the output has lost connection for more than 10 seconds. This feature needs firmware version 1.65.5 or above. It��s not supported on IS02BA.
Ø Protocol Control Settings:
�� Beep when a protocol is finished running
When checked, there will be a long beep when a protocol is finished running on IS02.
�� Allow increase/decrease of output current on run time
When checked, IS02BA will allow the user to change the output current on protocol run time by using key 4 and key 5. The first press of Key 4 or Key 5 will show the current intensity. The followed press of key 4 will decrease the current intensity by 20uA. The followed press of key 5 will increase the current intensity by 20uA.
On IS02LCD and IS02PRO, this option will enable to use Current+ and Current- key to change the output current.
�� Allow forward/backward of frequency pair on run time
When checked, IS02BA will allow the user to change the sequence of the frequency pairs on protocol run time by using key 1 and key 2. The first press of Key 1 or Key 2 will show the number of the frequency pair. The followed pressing of key 1 will backward by one the frequency pair in the protocol. The followed press of key 2 will forward by one the frequency pair in the protocol.
On IS02LCD and IS02PRO, this option will enable to use SKIP and HOLD to change the running frequency pair.
�� Output drive voltage
All Inspirstar IS02 models has a constant current driver to be able to drive a connection resistance up to 100K ohms. For applications with very good connection or low resistance electrodes, the voltage can be tuned down to save battery life.
Note
You can use button ![]() to retrieve the current settings from a
connected IS02.
to retrieve the current settings from a
connected IS02.
Note
Only IS02 with firmware version of 0.80
or greater supports these options.
3.7.5 Setup Communication
Profile Editor will automatically search
the IS02 connection on all available communication ports.
The Inspirstar USB Adaptor will show up
in Windows as a serial communication port. The Communication Setup window lists
all the available serial ports of the PC, including the existing serial ports.
Click on the pull down arrow to select the serial port for the Inspirstar USB
Adaptor. When port option ![]() is checked, Profile Editor will search
only the ports for the USB adapters, and the detection is faster. When the
option is not checked, the COMs for Bluetooth or other devices are included in
IS02 detection, thus will slow the detection process.
is checked, Profile Editor will search
only the ports for the USB adapters, and the detection is faster. When the
option is not checked, the COMs for Bluetooth or other devices are included in
IS02 detection, thus will slow the detection process.
You can select the serial port that was
assigned to the Inspirstar IS02 USB adaptor cable when the cable was plugged
into the PC. You can use the Auto detection option ![]() if you are not sure what port number was
assigned to the USB adaptor. Inspirstar Profile Editor will scan all serial
ports for Inspirstar IS02 if Auto detection option is checked.
if you are not sure what port number was
assigned to the USB adaptor. Inspirstar Profile Editor will scan all serial
ports for Inspirstar IS02 if Auto detection option is checked.
Click the ![]() button to start the searching for
Inspirstar IS02. The search result will be shown on the Communication Setup
window, as shown below.
button to start the searching for
Inspirstar IS02. The search result will be shown on the Communication Setup
window, as shown below.

The window can be invoked from either
1.
Tools
menu -> Setup Communication; or
2.
The
![]() button from the window of operations that
need to connect to Inspirstar IS02, such as Write Profile to, Product
Information, etc.
button from the window of operations that
need to connect to Inspirstar IS02, such as Write Profile to, Product
Information, etc.
It��s always recommended to check the
Auto Detection. This communication setup is used for all operations that
require a connection to Inspirstar IS02.
If no IS02 could be detected, the following window will pop up to remind you for the cable connections. Click on the picture to switch to other connection type and hints.
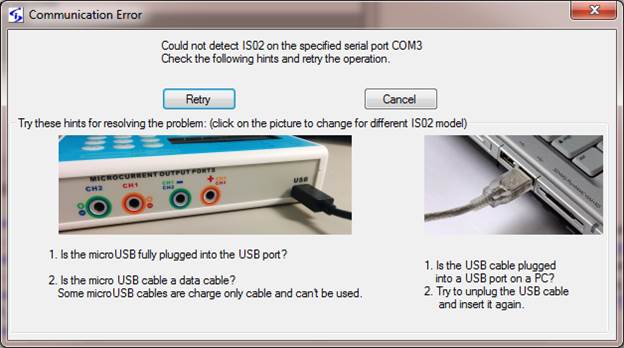
Figure 19 Hints For
Communication Problems
3.7.6 Retrieve Product Information
To retrieve product information of the
IS02 unit, use the Product Information tool in the Tools menu. The Product
Information window shows the model number, serial number, and the version of
firmware. If the IS02 model is IS02BA, IS02LCD, IS02PRO or newer models, the
battery status will be shown. You need to change to new batteries if the battery
status is in the red region.
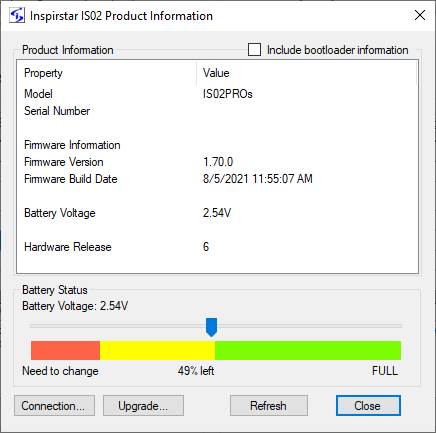
Figure 20 Product Information
To upgrade the firmware, click the
Upgrade button.
To retrieve the version information of
the bootloader, check ��Include bootloader information�� then click Refresh.
3.7.7 Upgrade IS02 Firmware
The firmware in IS02BA, IS02LCD, IS02PRO
and newer models can be upgraded to a newer version through the programming
communication port. The firmware in model IS02AA can not be upgraded in this
way.
The firmware usually comes with the new
Profile Editor software package. The new firmware is installed in this folder
by default:
C:\Program Files (x86)\Inspirstar\IS02\Firmwares
If you receive a new firmware file by
email or download it from web site, it��s better to save the file into the
default location, which is C:\Program Files (x86)\Inspirstar\IS02\Firmwares. A firmware
file must have .update as its extension name. The file name usually contains
the model name, hardware release and firmware release.
To start firmware upgrade,
- You will be prompted to upgrade the firmware when
Profile Editor is instructed to communicate with a connected IS02 machine
and if a newer version of firmware is available. We suggest you perform
the firmware upgrade.
- You can double click the firmware update file to bring
up the firmware upgrade window.
- Use menu command in Profile Editor window: Tools ->
Firmware Upgrade.
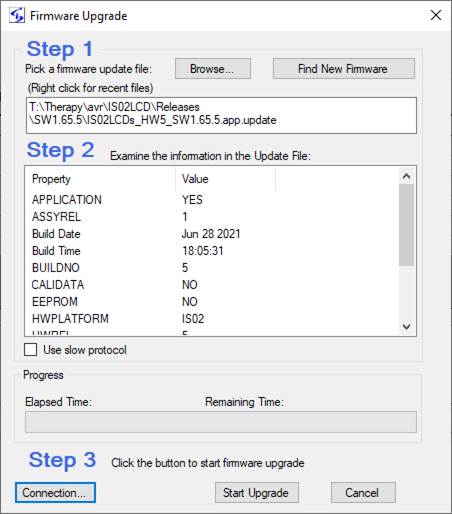
Figure 21 Firmware Upgrade
Follow the steps in the window to finish
the upgrade:
Step
1: Click the Find New Firmware button to
find the latest firmware version for your IS02 device. Or use the Browse button
to locate the .update file manually, after you select the proper update file
and click Open in the file browse window, the firmware information will show up
in the Step 2 window.
You need to look at bottom label under
the IS02 machine for the correct model name, or use Tools -> Product Information
to see the hardware information. Look for model name and hardware release
number in the Product Information window. The firmware update file must match
the model name and hardware release number.
For example, you have a model of IS02BA
of hardware release number 4. You need to look for update files with a file
name IS02BA_HW4_SWx.xx_x.*.update.
Step
2: Examine the information in the update
file. Key information to look at is model name MODEL, hardware release number
HWREL, the SWREL for firmware version and its build number BUILDNO.
Step
3: Click button ![]() to start the upgrade process.
to start the upgrade process.
Caution
During firmware upgrade, do not
disconnect the communication port or remove the batteries. Doing so will end up
with a non-functional IS02 unit. For IS02BA, if LED 1 to LED 5 are all turned
on, the firmware in the IS02 is not completed or damaged. You need to restart
and complete the above firmware upgrade steps to bring the IS02 back to
functional.
3.7.8 Register Software License
To
check existing software license or to register a license for a new software
feature, use menu Help -> Register License, the following window will pop
up. The window will pop up when you try to use a feature that you don��t have a
license.
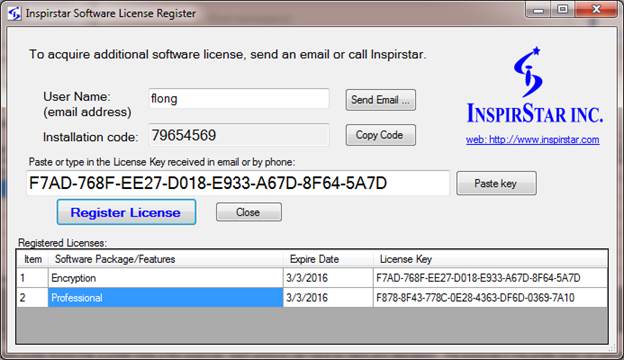
Figure 22 License Registration Window
If
you don��t have a license or want to purchase a new license, click on button ![]() ,
your email client software will pop up with a email draft to sales@inspirstar.com. The user name and the installation code
is populated in the email body. You can add some other information then send
the email for a software license.
,
your email client software will pop up with a email draft to sales@inspirstar.com. The user name and the installation code
is populated in the email body. You can add some other information then send
the email for a software license.

3.8 Menus and Tool Bars
3.8.1 File Menu
The Profile menu has utilities for
operations on profiles.
New Profile: Start
an empty profile with five protocols. There are no frequency pairs in each
protocol. You will be prompted to save the current profile if it has been
modified.
Create Profile From:
Create a new profile by using existing protocols from the current opened
profile. A new profile window will pop up.
Open Profile: Open
an existing profile. By default, a profile has the extension name of
��.profile��. You will be prompted to save the current profile if it has been
modified.
Open Examples: Open example
profiles. A few example profiles are installed.
Close Profile: Close the current
profile and start a new profile. You will be prompted to save the current
profile if it has been modified.
Save Profile: Save
the current profile to a file. By default, a profile has the extension name of
��.profile��.
Save Profile As:
Save the current profile with a different name. By default, a profile has the
extension name of ��.profile��.
Print: Print current profile on a
printer.
Print Preview:
Preview the printing result of the current profile screen before printing.
Print with Protocols:
Print the profile with all protocols when this menu item is checked.
Print with Frequency Lines:
Print all frequency lines for each protocol.
Page Setup: Setup
the page formats for printing.
Recent Profiles:
List of most recently used (MRU) profiles. Click one of the files in the list
to open it.
Exit: Exit Inspirstar IS02
Profile Editor. You will be prompted to save the current profile if it has been
modified.
3.8.2 Edit Menu
The Edit Menu Menu has editing commands
and utilities for protoocls
Cut: Remove the selected protocols
and put them into Windows Clipboard for paste.
Copy: Copy the selected protocols
to Windows Clipboard.
Paste(Insert): Insert
the protocols in Windows Clipboard before the selected protocols.
Select All: Select
all protocols listed in this window.
Global Find: Find
frequency pairs with certain parameters.
Global Change: Change
one or more parameters of all frequency pairs in selected protocols.
3.8.3 Tools Menu
Read Profile from IS02��:
Read the profile from IS02. The current profile will be overwritten. You will
be prompted to save the current profile if it has been modified. For details,
please refer to 3.7.2.2
To Read Profile from
Inspirstar IS02
on page 37.
Write Profile to IS02��:
Write the current profile to Inspirstar IS02. For details, please refer to 3.7.2.3
To Write Profile to
Inspirstar IS02
on page 38.
Append Profile to IS02��: Append the current profile
to Inspirstar IS02. For details, please refer to 3.7.2.5 To Append Profile to Inspirstar IS02 Device on page 40.
Erase Profile in IS02��: Erase the user profile in IS02.
For details, please refer to 3.7.2.4 To Erase Profile in Inspirstar IS02 on page 39.
Memory Configuration��: allocates more or less
memory for protocols.
Change IS02 Settings��: changes the settings in Inspirstar
IS02 PMS.
Product Information��: shows the model number,
serial number, firmware version, battery status etc.
Firmware Upgrade��: upgrades the firmware for
Inspirstar IS02 PMS.
Setup Communications: setup the port and
communications between PC and Inspirstar IS02 PMS.
Run Profile in Real Time
Control Panel:
Run this profile in Real Time Control Panel.
3.8.4 Help Menu
Contents/Index/Search:
Open the on-line user��s guide for Inspirstar Profile Editor.
User��s Manuals: Opens
the manual of Inspirstar IS02.
Check for Updates:
connects to internet and checks it there is a software update.
Check for News: connects
to internet and checks it there is a news from Inspirstar Inc.
Register License:
Register software license
About: About the version of Profile
Editor.
3.8.5 Tool Bars
Place you mouse pointer on the icons on
the tool bar for one second, you will see the associated menu command for the
icon.
3.8.6 Shortcut Keys
Most of the menu commands have shortcut
keys for quick access. The shortcut keys are shown at the right side of each
menu items, if there is a shortcut available to that menu command.
Table 1 Profile Editor Shortcut Keys
|
Operation |
Shortcut Keys |
Operation |
Shortcut Keys |
|
Profile
Commands |
|
Protocol
Commands |
|
|
New Profile |
Ctrl+N |
Import |
Ctrl+I |
|
Open Profile |
Ctrl+O |
Export |
Ctrl+E |
|
Save Profile |
Ctrl+S |
Replace |
Ctrl+L |
|
Close Profile |
Ctrl+F4 |
Add New |
Insert |
|
Print |
Ctrl+P |
Remove |
Delete |
|
|
|
Move Up |
Ctrl+ Up |
|
Write Profile to |
Ctrl+W |
Move Down |
Ctrl+ Down |
|
Read Profile from |
Ctrl+R |
Edit Protocol 1 |
Ctrl+1 |
|
|
|
Edit Protocol 2 |
Ctrl+2 |
|
Edit
Commands |
|
Edit Protocol 3 |
Ctrl+3 |
|
Cut |
Ctrl+X |
Edit Protocol 4 |
Ctrl+4 |
|
Copy |
Ctrl+C |
Edit Protocol 5 |
Ctrl+5 |
|
Paste(Insert) |
Ctrl+V |
Edit Protocol 6 |
Ctrl+6 |
|
Select all |
Ctrl+A |
Edit Protocol 7 |
Ctrl+7 |
|
Global Find |
F3 |
Edit Protocol 8 |
Ctrl+8 |
|
Global Change |
Ctrl+G |
Edit Protocol 9 |
Ctrl+9 |
4 Protocol Editor
4.1 Start Protocol Editor
To start the Inspirstar Protocol Editor,
- To edit a protocol in a profile, you need to start the
Protocol Editor from a Profile Editor. Select a protocol in the Profile
Editor window and click on Edit button, or double click the line of the
protocol.
- To start with a blank standalone protocol, use Windows
Start -> All Programs -> Inspirstar -> Protocol Editor;
- To edit a standalone protocol file in disk, browse to
a protocol file using the Windows Explorer; double click on the file with
extension .protocol.
4.2 Window Layout
The Protocol Editor window is shown in
the following picture. Explanation of the windows areas is as follows from the
top to the bottom of the window.
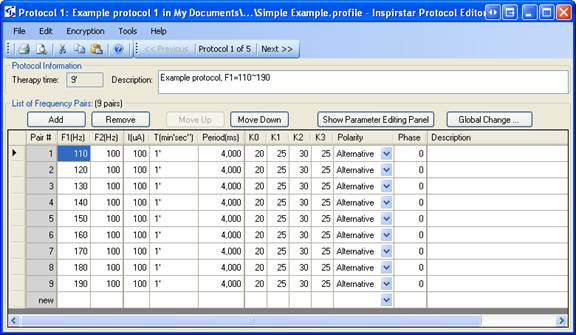
Figure 23 Protocol Window
Menus
and Tool Bars
You can use the menus and tool bars to
perform actions on this protocol and frequency pairs. More explanation on menus
and tool bars can be found in section 4.8
Menus and Tool Bars
Frequency
Pairs Operation Tools
Most frequently used tools for frequency
pair manipulation are shown above the frequency pair list.
Frequency
Pair List
The frequency pairs in the protocol are
listed in the box. The values in some cells in the table can be changed
directly in the table.
4.3 Start with a Protocol
4.3.1 To Edit a Protocol in a Profile
To start the Protocol Editor
in a profile,
1.
Click
to select a protocol for editing.
2.
Click
on tool button ![]() ,
or double click the line of the protocol, the Protocol Editor window will pop
up.
,
or double click the line of the protocol, the Protocol Editor window will pop
up.
3.
After
you finish editing the protocol, you may click menu command File -> Close
and back to Profile, or directly click the X  of the window. The changes to the
protocol will be saved when you save the profile.
of the window. The changes to the
protocol will be saved when you save the profile.
4.3.2 To Edit a Standalone Protocol
TO edit a standalone
protocol, do one of the following:
��
Use
the menu command File -> Open Protocol; or click the Open Protocol icon ![]() on the tool bar, to load an existing protocol.
on the tool bar, to load an existing protocol.
��
Use
Windows Explorer to browse to a protocol file, double click the protocol to
open it. A protocol file ends with extension name .protocol.
4.3.3 To Merge a Protocol
You can merge the frequency
pairs in another protocol in the current protocol. When a protocol is merged
with the current protocol, all the frequency pairs in the merged protocol will
be inserted before the current line.
To
merge a protocol with menu commands,
1.
Select
a line in current protocol window. This is the line that the frequency pairs in
the merged protocol will be inserted before.
2.
Use
the menu command File -> Merge Protocol, then file open dialog, browse to
the protocol file in disk to be merged, click button ![]() .
.
To
merge a protocol with Windows Drag and Drop,
1.
Use
Windows Explorer to browse to the protocol file to be merged, drag (click the
file and hold it and move the mouse) it into the frequency pair list table. A
red line will indicate the point for the frequency pair to be inserted at.
2.
Drop
the file by releasing the mouse button. All the frequency pairs in the protocol
file will be merged (inserted) in the current protocol.
To
merge a protocol with Copy, Cut and Paste feature,
1.
In
Profile Editor window, select a protocol and do copy (Ctrl+C) or cut (Ctrl+X).
2.
Switch
to Protocol Editor window, select the line for the merge, then do paste
(Ctrl+V), the protocol in Windows clipboard will be inserted to the current
protocol.
Caution
If the merged file is a profile with
multiple protocols, all protocols in the profile will be merged into current
protocol.
4.3.4 To Save a Protocol
When the protocol belongs to
a profile, you can only export the protocol to a disk file.
To
export the current protocol to a disk file,
��
Use
the menu command File -> Export Protocol As, and give a new name for the
file.
When the protocol is a standalone
protocol, you can save it with its current filename, or save it with a new name.
To
save the current protocol,
��
Use
the menu command File -> Save Protocol; or click the Save Protocol icon ![]() on the tool bar, to save the current protocol.
on the tool bar, to save the current protocol.
To
save the current protocol with a new name,
��
Use
the menu command File -> Save Protocol As, and give a new name for the file.
4.3.5 To Print a Protocol
To
print the current protocol, use menu command File -> Print or tool bar
button![]() ,
the Print dialog will pop up.
,
the Print dialog will pop up.
To
Preview the print of current protocol, use menu command File -> Print
Preview or tool bar button![]() ,
the Print Preview window will show up.
,
the Print Preview window will show up.
To change the orientation of the page, or adjust the margins on page, click on menu File -> Page Setup or click on the Page Setup button on the Print Preview window.
4.4 Organize Frequency Pairs in a Protocol
4.4.1 To Select Frequency Pairs
All frequency
pairs of the current protocol are listed in the frequency pair table. Each line
in the table shows the parameters of one frequency pair. The number of the
frequency pairs is shown in the title ![]() .
.
You
can select one frequency pair to edit its parameters. Or you can select one or
multiple frequency pairs in the list for operations such as cut, copy, remove
and export. Selected frequency pairs will be highlighted. The current line is
marked with an arrow. The insertion point is always at the current row.
|
|
l
To
select one frequency pair, click the row header of one pair. The selected row
will be highlighted. The current row will be marked with an arrow. |
|
|
l
To
select multiple frequency pairs in consecutive range, click the row header of
the first pair with the left mouse button, then hold down the SHIFT key on the keyboard, and then click
the row header of another frequency pair in the list. The frequency pairs
between the two clicks will be selected. |
|
|
l
To
select multiple frequency pairs in scattered locations, hold down the CTRL key on the keyboard, then click
the row headers of the frequency pairs you want to select. |
|
|
l
To
select all frequency pairs in the list, use command ��Select All frequency
pairs�� in the Frequency Pairs menu; or press CTRL+A. |


4.4.2 To Add a New Frequency Pair
To
add a frequency pair in the middle of the list,
1. Select a frequency pair as the reference,
2. Do one of the following,
��
Click on tool bar button ![]()
�� Or Press Insert key
�� Or Press Ctrl + ��+�� key
3. The reference frequency pair will be duplicated and added after the current line.
To
add a new frequency pair at the end of the protocol,
1.
Move
the cursor to last row of the table,
2.
Enter
new values in any of the blank cells. And press enter or move the cursor off
the cell.
To
add a group of frequencies like 12,34,56/78,90
1.
Move
the cursor to F1 cell of a row,
2.
Enter
frequencies of F1 followed by frequencies of F2, for example 12,34,56/78,90. And press enter or move
the cursor off the cell.

3.
6
lines will be added with the combination of the F1 frequencies with F2
frequencies
4.4.3 To Remove Frequency Pairs
To
remove frequency pairs from the protocol,
1. Select the frequency pairs in
the list,
2. Do one of the following,
��
Click on tool bar button ![]()
�� Or Press Delete key
�� Or Press Ctrl + ��-�� key
3. All selected frequency pairs
will be removed.
4.4.4 To Move Frequency Pairs
You
can change the order of frequency pairs in a protocol by using buttons or
editing commands.
Use ![]() or
or ![]() buttons
buttons
- Select the frequency
pairs you want to change the order,
- Click the
 or
or  button.
You
can select multiple frequency pairs and move them all together. This method can
only be used to move frequency pairs within a protocol.
Use cut and paste
- Select the frequency
pairs you want to move,
- Cut (Ctrl+X) the
selected frequency pairs into clipboard.
- Select a line for the
new position,
- Paste (Insert, Ctrl+V) the
frequency pairs from clipboard.
This
method can be used to move frequency pairs within a protocol and between protocols.
Use Export and Import methods
- Select the frequency
pairs you want to move
- Use menu command Edit
-> Export Selected Frequency Pairs ,�� to export the selected frequency
pairs into a file.
- Select a line for the
new position,
- Use menu command Edit
-> Import Frequency Pairs to import the exported frequency pairs.
This
method can be used to move frequency pairs between protocols, and between profiles.
You can open multiple instances of Inspirstar
Protocol Editor so you can cut and paste frequency pairs between protocols.
4.4.5 To Cut, Copy and Paste Frequency Pairs
To cut, copy and paste frequency pairs from/to Windows clipboard,
- Click the row header to select a single frequency pair or multiple frequency pairs in the protocol.
- Click on tool button , or press Ctrl-X to cut the
selected protocols off the protocol. The selected frequency pairs will be
removed from the protocol to the Windows clipboard.
- Click on tool button
 , or press Ctrl-C to copy
the selected frequency pair. The selected frequency pairs will be copied
to the Windows clipboard.
, or press Ctrl-C to copy
the selected frequency pair. The selected frequency pairs will be copied
to the Windows clipboard. - Click on tool button , or press Ctrl-V to paste frequency
pair from Windows clipboard into the protocol.
4.4.6 To Import Frequency Pairs
If you have export frequency pairs to a file in disk, you can import the frequency pairs into the protocol.
To import frequency pairs into the protocol,
- With menu command,
1. Use menu command Edit -> Import Frequency Pairs,
2. Browse to select an exported frequency pair file,
3. Select OK. The frequency pairs in the file will be imported to current protocol after the current line, i.e. the operation is ��insert after��.
- With Drag-Drop operation
1. Use the Windows Explorer to browse to the file to be imported,
2. Hold the mouse button to drag the file into the Protocol Editor window, there will be a red line for the insertion point in the table when the file is in the table area.
3. Drop the file into the table of frequency pairs. The frequency pairs in the dragged file will be imported at the insertion point that was highlighted by a red line.
NOTE
You can import a protocol file, or a profile that contains multiple protocols. When the file contains multiple protocols, all frequency pairs will be imported in sequence.
TIPS
You can import a recently used protocol file with a right click the table and select a file in the list.

4.4.7 To Export Frequency Pairs to a File
You can export frequency pairs in the protocol to a protocol file in disk for other uses. To export a frequency pairs,
1. Click the row header to select a frequency pair or multiple frequency pairs.
2. Use menu command Edit -> Export Selected Frequency Pairs, a file browsing dialog opens up.
3. Browse to a folder and give a name for the protocol file. By default, the frequency F1 and F2 are used in the file name.
4. Click SAVE to finish exporting the frequency pairs.
4.4.8 To Move Frequency Pairs between Protocols or Profiles
To move or duplicate frequency pairs between protocols or profiles, you can choice the following methods.
Through Cut, Copy and
Paste:
1. Click the row header to select frequency pairs in the first protocol.
2.
Click on tool button ![]() ,
or press Ctrl-C to copy the selected frequency pairs. The selected frequency
pairs will be copied to the Windows clipboard.
,
or press Ctrl-C to copy the selected frequency pairs. The selected frequency
pairs will be copied to the Windows clipboard.
3. Open another protocol, or move to another protocol in the same profile.
4.
Click on tool button ![]() ,
or press Ctrl-V to paste the frequency pairs from Windows clipboard into the second
protocol.
,
or press Ctrl-V to paste the frequency pairs from Windows clipboard into the second
protocol.
Through Export and Import:
1. Click the row header to select frequency pairs in the first protocol.
2. Use menu command Edit -> Export Selected Frequency Pairs, or press Ctrl-E to export the selected frequency pairs to a disk file.
3. Open another protocol, or move to another protocol in the same profile.
4. Use menu command Edit -> Import Frequency Pairs, or press Ctrl-I to import the protocol file which was exported from the previous step.
NOTE
You
can open two Protocol Editor windows and copy and paste frequency pairs between
the two protocols.
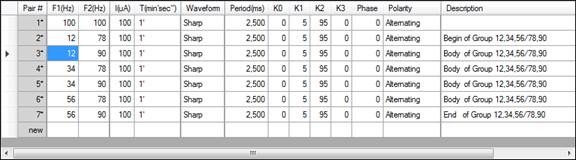
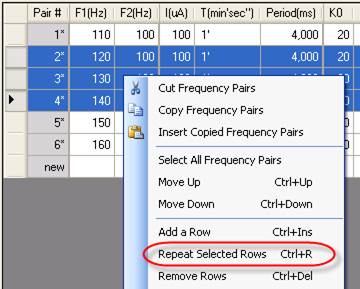
4.4.9 To Repeat Frequency Pairs
To repeat some frequency pairs in a protocol,
1.
Select
rows of frequency pairs for the repeat, for example, row 2,3 and 4
2.
Right
click in the box, a context menu will pop up. Select Repeat Selected Rows.
3.
A
loop is created for the selected rows.
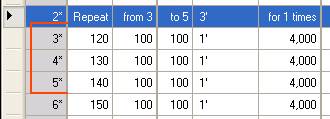
4.
To
change the number of times to repeat, select cell ��for 1 times��, and type in a
new number.
![]()
5.
To
change the last row in the loop, select the ��To�� cell in the repeat row, and
type in a new number.
![]()
HINT
To see
more examples about repeat or loops, open the example profile ��Loop
Examples.profile�� from menu File -> Open Examples in Profile Editor window.
4.4.10 To Copy/Paste Contents of Frequency Pairs to/from Excel Spreadsheet
The contents of protocol can be selectively copied and pasted between Excel spreadsheet.
To copy cells to Excel
Spreadsheet:
1. Select the cells to be copied. Do not select row headers.
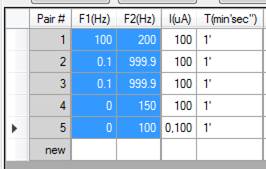
2. Use menu command Edit -> Copy, or press Ctrl-C to copy the selected cells.
3. Open Excel spreadsheet, select the cell to be pasted to.
4. Press Ctrl+V to paste the contents into spreadsheet.
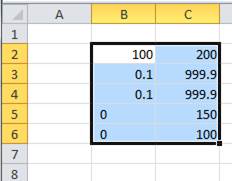
To copy cells from Excel
Spreadsheet:
1. Create contents in Excel spreadsheet, with the same structure as in Protocol Editor. Select the contents to be copied. Press Ctrl+C.
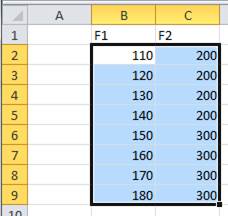
2. In Protocol Editor, locate the starting cell to be pasted into.
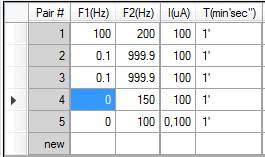
3. Press Ctrl+V to paste the contents. New values will be pasted into the existing lines and replace the old values. New lines will be added when the pasted values has reached the end of protocol.
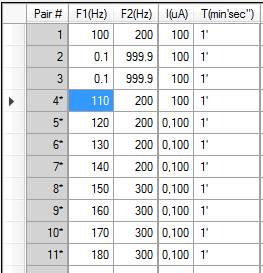
4.4.11 To Include other protocols
The Include feature allows to run a group of protocols as one line in a protocol. Right click a row in Protocol Editor to include other protocols as one of the ��sub protocol��.
4.4.11.1 To Include Protocols in the Same Profile
To include other protocols in the same profile as this protocol,
1.
Click
one of the cell of the row for the included protocol.

2.
Click
the right mouse button for the context menu, select Include other Protocols
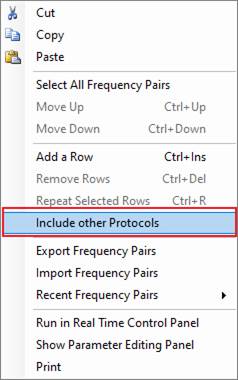
3.
Select
the protocols to be included, then click Include button.
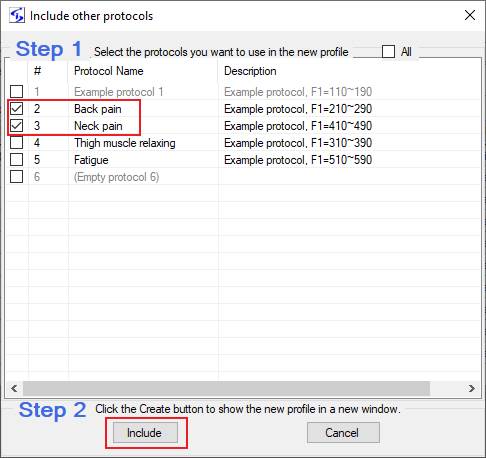
4.
The
selected protocols will be included in this protocol. The name of the included
protocol is shown in the ��waveform�� column.

NOTE
If an ��include�� loop is made because the included protocol also includes the including protocol, the IS02 device will ignore the included protocol during running.
NOTE
The IS02 device needs to have firmware version 1.70 or higher for this Include feature. The feature is not supported for IS02BA and IS02AA.
HINT
To see
more examples about repeat or loops, open the example profile ��Batch(include)
examples.profile�� from menu File -> Open Examples in Profile Editor window.
NOTE
The header of the row of protocols will have green background color if the protocol has included other protocols. The protocol line # will be displayed as Bold black if the protocol has been included by other protocols. Hoover the mouse pointer to the Line # cell to show the tips for the protocol. See illustration below.
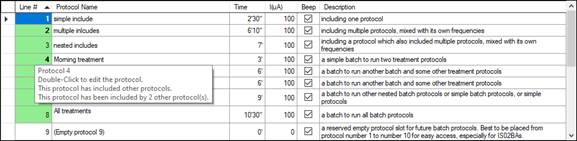
4.4.11.2 To Include Existing Protocols in IS02
Device
NOTE
This Include external protocols in IS02 device is only useful when this protocol is to be appended to that IS02 device. To append this protocol to IS02 device, please refer to 3.7.2.6 ��To Append one or multiple Protocols�� on page 41.
To
Include an existing protocol in IS02 device,
- Create a line to include
a protocol in this profile first. Refer to 4.4.11.1 To Include Protocols
in the Same Profile on page 70 for detail steps.

- Manually enter the
protocol number of the existing protocol in the IS02 device, use negative
sign �� �C �� to refer to the external protocol, for example, enter -28 to
include the existing protocol number 28 in the IS02 device.
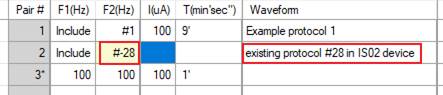
NOTE
The IS02 device needs to have firmware version 1.75 or higher for Include to an existing protocol in IS02 device.
4.5 Find Frequency Pairs
To find frequency pairs with certain
parameters in the protocol or in the profile, you can use the Global Find tool
from Edit menu. The following dialog will show up.
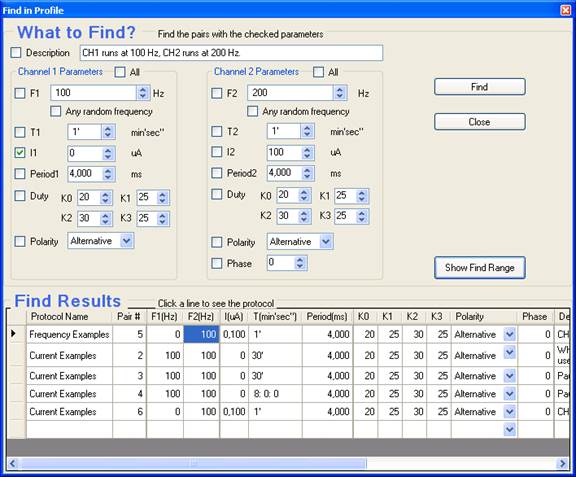
Step
1: Check the parameters that you want to
find, and give the value of the parameters. For example, the above window finds
all the pairs with CH1 current of 0uA.
Step
2: Optional to specify the protocols as
the find range. Use button ![]() or
or ![]() to toggle the protocol selections. Check
the protocols to be searched.
to toggle the protocol selections. Check
the protocols to be searched.

Step
3: Click the ![]() button to start the search. The found
pairs is listed in the bottom box of the dialog. Click a row of the found pairs
to see the containing protocol of the pair.
button to start the search. The found
pairs is listed in the bottom box of the dialog. Click a row of the found pairs
to see the containing protocol of the pair.
4.6 Change Parameters of Frequency Pairs
4.6.1 Using the Table
You
can change the parameters for each frequency pair directly in the list table.
To select a cell
The
selected cell is highlighted. The following example shows that the current
Intensity of pair #2 is selected for editing.
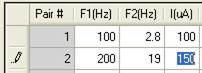
To change the value
You
can enter the value into the cell when the cell is selected. The old value will
be cleared. To edit the old value in the cell, you can press F2 to enter into
edit mode to change the value. The row header will be changed to pencil symbol ![]() when a cell of the row is in editing.
After you finish editing the cell, you can simply move to other cells with
arrow keys or press enter.
when a cell of the row is in editing.
After you finish editing the cell, you can simply move to other cells with
arrow keys or press enter.
To change different values for CH2
Only
the frequency for channel 2 is shown in a separate cell. All other parameters
of ch1 and ch2 are sharing a cell. To use different values for channel 2, type
in two values in the cell, separate the values with a comma. The first value is
for channel 1, and the second value is for channel 2.
TIPS
You can use the parameter panels to change the values for channel 2. You will see how the two values are displayed in the cell. You can use the same format to enter values for both CH1 and CH2 directly in the table.
To change the polarity
With mouse: Click on the drop down arrow to select
the desired polarity setting
With keyboard: Press F2 to enter into edit
mode, then use up and down arrow to select the desired polarity setting.
4.6.2 To use Random Frequency for F1 or F2
The
frequency for CH1 and CH2 can be specified as certain frequency within the
range that IS02 supports. The frequency can also be specified as ��Random
Frequency��. A random frequency is specified with a range of frequencies, and
IS02 will choose one of the frequencies randomly at protocol run time.
Normal
Frequency: ![]() F1 is 100Hz, F2 is 100Hz.
F1 is 100Hz, F2 is 100Hz.
Random
Frequency for F1: ![]() frequency low end is 100Hz, high end is 200Hz. Default
granularity is 1 Hz. So the actual frequency at run time will be one chosen out
of 101 frequencies.
frequency low end is 100Hz, high end is 200Hz. Default
granularity is 1 Hz. So the actual frequency at run time will be one chosen out
of 101 frequencies.
Random
Frequency for F1: ![]() frequency low end is 100Hz, high end is 200Hz, with 20Hz.
So the actual frequency at run time will be one chosen out of 6 frequencies,
namely 100, 120, 140, 160, 180, 200Hz.
frequency low end is 100Hz, high end is 200Hz, with 20Hz.
So the actual frequency at run time will be one chosen out of 6 frequencies,
namely 100, 120, 140, 160, 180, 200Hz.
HINT
To see more examples about random
frequency, open the example profile ��Random Frequency Examples.profile�� from
menu File -> Open Examples in Profile Editor window.
TIPS
You can repeat the Random Frequency to get different frequencies at run time for the same setting. See ��To Repeat Frequency Pairs�� for more details on repeat or loop.
4.6.3 Using Parameters Editor Panel
4.6.3.1 Parameters Editor Panel Overview
Click
button ![]() to bring up the parameter editor panel as
shown below. The panel will stay on top of the protocol window.
to bring up the parameter editor panel as
shown below. The panel will stay on top of the protocol window.
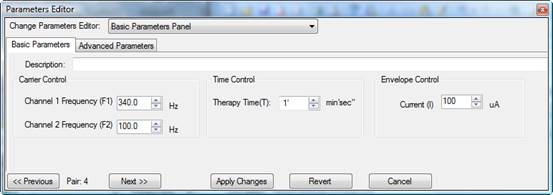
The
parameter editor panel accommodates three different types of sub panels for
your convenience on viewing or changing the parameters of a frequency pair. To
switch between panels, click and choose from the drop down list on the top of
the panel.
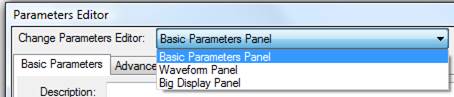
To change
the parameters for a frequency pair in the parameters panel, you need to select
the frequency pair in the frequency pair list box. The parameters for the
selected frequency pair will be shown in the parameters panel for editing.
The
sequence number (or pair number) of the frequency pair being shown is listed
above the parameter panel like this ![]() .
You can use button
.
You can use button ![]() or
or
![]() to browse the frequency pair in the
protocol.
to browse the frequency pair in the
protocol.
The
changes will be applied to the frequency pair when you do one of the following,
l Press ENTER key after
entering new values;
l Click on the ![]() button.
button.
l Click on the Protocol Editor
window;
l Click on the button ![]() or
or ![]() .
.
4.6.3.2 Basic Parameters Panel
There
are two parameter pages on the parameters panel: Basic Parameters page and
Advanced Parameters page: ![]()
The
Basic Parameters page allows you to change the most commonly used parameters of
a protocol. You can change the carrier frequencies for each channel, the
therapy time of the frequency pair, the envelope current and period for both
channels, and the description of the pair, as shown in the following picture.
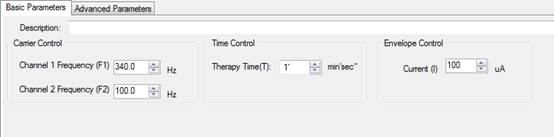
Usually
the other parameters are the same for both channel 1 and channel 2. If they are
not, you will be prompted to use the Advanced Parameter page for those
parameters. You can click on the link to switch to the Advanced Parameters
page, or click on tab for the Advanced Parameters page.
Advanced
Parameters page lists all parameters for each channel. The page is shown as the
following picture:
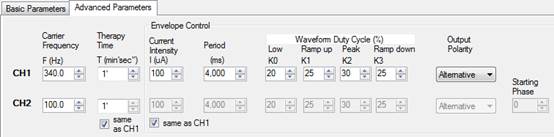
You
can enter new values for each parameter, or use the up-down arrow to change the
value.
4.6.3.3 Waveform Panel
The
waveform panel provides visual display for the output waveform from IS02. You
can see how the parameters change the output waveform.
4.6.3.4 Big Display Panel
The
big display panel shows selected parameters in very big format. This is useful
when you want to see the parameters from distance. The panel also allows you to
point the mouse at the digits and change the value with mouse wheel or click.
4.6.4 Using Global Change
To
apply the parameters of the current pair to the other pairs in the protocol or
the profile of the protocol, you can use the Global Change tool.
Step 1: Select the frequency pair
that contains the parameters you want to apply to other pairs.
Step 2: Invoke the Global Change
tool by clicking button ![]() ;
or select menu Tools -> Global Change. The Global Change window will show up
as in Figure 24 Global
Change.
;
or select menu Tools -> Global Change. The Global Change window will show up
as in Figure 24 Global
Change.
Step 3: Follow the three steps in
the window. When you have selected the parameters and protocols to apply, click
on the ![]() button to apply the change. Or
button to apply the change. Or ![]() to close the window without changing
anything.
to close the window without changing
anything.
Figure 24 Global Change
The
above example changes the period for both CH1 and CH2 to 2500ms for protocol 4
and protocol 5 in the profile.
4.6.5 To Change Default Parameters
When a line is inserted, the parameters of previous line will be carried over as the base for a new line. When a new line is added to a blank protocol, the line will have default parameters. The default parameters can be modified and saved for future use.
Browse to C:\Program Files\Inspirstar\IS02\Predefined\DefaultPair.protocol, and double click to open the protocol file.
The
first line in the DefaultPair.protocol gives the default parameters of a new
line in a blank protocol. Change the parameters in the first line with new
default parameters and save the file, the new parameters will be used as
default.This default is shared for all users on the same computer.

To
save the new default parameters just for you on this computer, save the
DefaultPair.protocol file to folder Documents\IS02\Predefined in your document
library.
4.7 Manage Predefined Waveforms
A waveform can be pre-defined and given a name for ease of use. Protocol Editor will compare the parameters of a frequency pair with the parameters of predefined waveform. The predefined waveform name is displayed for the frequency pair when the parameters are matched. A predefined waveform is defined by the parameters of period, duty cycles K, phase and polarity.
4.7.1 To change parameters to a predefined waveform
In Protocol Editor window, select the cell under Waveform, and click the dropdown arrow to see all the pre-defined waveforms, select the desired waveform, the parameters of the waveform will be applied to the line.
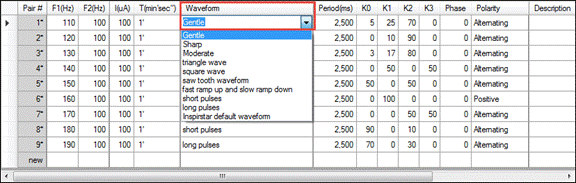
4.7.2 To Show or hide waveform parameters
To show or hide the details of waveform parameters, check or uncheck the Show Waveform Details at the top of the waveform list.
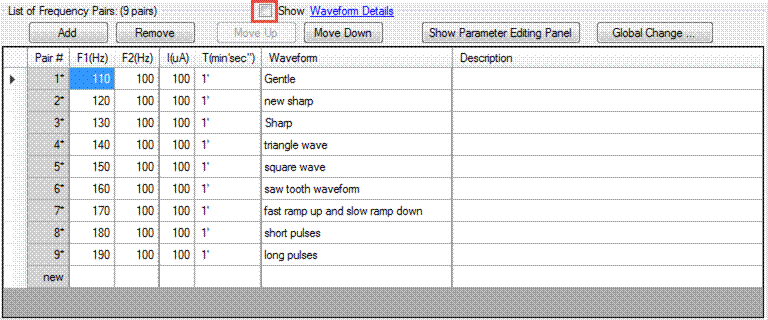
4.7.3 To select the parameters in a waveform
To select the defining parameters for a predefined waveform name, click on the Waveform Details, then check or uncheck the parameters to be used in a waveform.
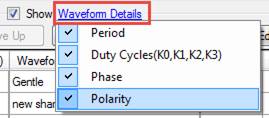
4.7.4 To define a new waveform
Click
on the cell under the waveform column, type in the new waveform name and press
Enter, this waveform will be added as a pre-defined waveform.
![]()
You
will be asked to confirm to define this new waveform, press YES to confirm.

The
new waveform will be saved in Users\Documents\IS02\Predefined\Waveforms.protocol.
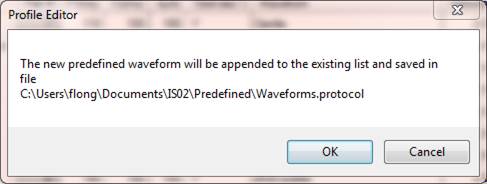
4.7.5 Manage Predefined Waveforms
To change the name or remove a predefined waveform, select menu Tools -> Edit Predefined Waveforms
The
predefined waveforms are listed as a protocol. Each line is one predefined
waveform. The waveform name is given as the description of the line.
To
change the name of a waveform, change the description of the line.
To
remove a waveform, select the waveform line and click Remove button.
To
change the parameters of the waveform, change the period, K, phase or polarity
of the waveform.
To
change the order of the waveforms, move the l

After
the window is closed and waveforms.protocol is saved, the changes to the
predefined waveform will be applied.
4.8
Menus and Tool Bars
4.8.1 File Menu
This menu has utilities for operations
on protocols.
When the protocol belongs to a profile,
the File menu has the following commands:
Merge Protocol: Import
a protocol and merge with the current protocol to a new protocol.
Previous Protocol:
Change to edit the previous protocol in the same profile.
Next Protocol: Change
to edit the next protocol in the same profile.
Export Protocol:
Export the current protocol to a file.
Print: Print current protocol on a
printer.
Print Preview:
Preview the printing result of the current protocol on a printer.
Page Setup: Setup
the page formats for printing.
Close and back to Profile:
Close this protocol window and go back Main Window. The information of this
protocol is automatically saved in the profile.
When the protocol is a stand alone
protocol, the File menu has the following commands:
New Protocol: Start
an blank protocol. You will be prompted to save the current protocol if it has
been modified.
Open Protocol: Open
an existing protocol. By default, a protocol has the extension name of ��.protocol��.
You will be prompted to save the current protocol if it has been modified.
Merge Protocol: Import
a protocol and merge with the current protocol to a new protocol.
Close Protocol: Close the current protocol and start a
new protocol. You will be prompted to save the current protocol if it has been
modified.
Save Protocol: Save
the current protocol to a file. By default, a protocol has the extension name
of ��.protocol��.
Save Protocol As:
Save the current protocol with a new name. By default, a protocol has the
extension name of ��.protocol��.
Print: Print current protocol on a
printer.
Print Preview:
Preview the printing result of the current protocol screen before printing.
Page Setup: Setup
the page formats for printing.
Recent Protocols:
List of most recently used (MRU) protocol files. Click one of the files in the
list to open it.
Exit: Exit Inspirstar IS02 Protocol
Editor. You will be prompted to save the current protocol if it has been
modified.
4.8.2 Edit Menu
This menu has editing commands and
utilities for frequency pairs.
Cut: Remove the selected
frequency pairs and put them into Windows Clipboard for pasting.
Copy: Copy the selected frequency
pairs to Windows Clipboard.
Paste(Insert): Insert
the frequency pairs in Windows Clipboard before the selected frequency pair.
Select All Frequency Pairs:
Select all frequency pairs of the protocol.
Export Selected Frequency Pairs:
Export the selected frequency pairs to a file.
Import Frequency Pairs:
Insert the frequency pairs in a file before the selected frequency pair.
Global Find: Find
frequency pairs with certain parameters.
Global Change: Change
one or more parameters of all frequency pairs in selected protocols.
TIPS
The saved files have the same extension
name as ��.protocol�� when you save a protocol or export frequency pairs.
4.8.3 Tools Menu
Global Change��: Apply
the parameters of the current frequency pair to part of or all the protocols in
the current protocol or all protocols in the profile. For details, please refer
to 4.6.4
Using Global Change.
Run Protocol In Real Time Control Panel:
Run this protocol in Real Time Control Panel.
4.8.4 Help Menu
Contents/Index/Search:
Open the on-line user��s guide for Inspirstar Profile Editor.
About: About the version of Profile
Editor.
4.8.5 Tool Bars
Place you mouse pointer on the icons on
the tool bar for one second, you will see the associated menu command for the
icon.
4.8.6 Shortcut Keys
Most of the menu commands have keyboard shortcut
keys for quick access. The shortcut keys are shown at the right side of the
each menu items, if there is a shortcut available to that menu command.
Table 2 Profile Editor Shortcut Keys
|
Operation |
Shortcut Keys |
Operation |
Shortcut Keys |
|
Protocol
Commands |
|
Frequency
Pair Commands |
|
|
New Protocol |
Ctrl+N |
Import |
Ctrl+I |
|
Open Protocol |
Ctrl+O |
Export |
Ctrl+E |
|
Save Protocol |
Ctrl+S |
Add |
Insert |
|
Close Protocol |
Ctrl+F4 |
Remove |
Delete |
|
Print |
Ctrl+P |
Move Up |
Ctrl+ Up |
|
Merge Protocol |
Ctrl+M |
Move Down |
Ctrl+ Down |
|
|
|
|
|
|
Edit
Commands |
|
|
|
|
Cut |
Ctrl+X |
|
|
|
Copy |
Ctrl+C |
|
|
|
Paste(Insert) |
Ctrl+V |
|
|
|
Select all |
Ctrl+A |
|
|
|
Global Change |
Ctrl+G |
|
|
5 Real Time Control Panel
5.1 Start Real Time Control Panel
The Real Time Control Panel is not enabled when the software package is shipped to you. To enable this feature, please send an email to sales@inspirstar.com, or give a call to Inspirstar. The number can be found at www.inspirstar.com.
To start the Real Time Control Panel,
- Click program from Windows Start -> All Programs -> Inspirstar -> Real Time Control Panel,
- Or in Profile Editor window, click menu command Tools -> Real Time Control Panel.
5.2 Window Layout
The Real Time
Control Panel is shown in the following
picture. Explanation of the areas in the panel is as follows from the top to
the bottom of the panel.

Figure 25 Real Time Control Panel
Profile
Feeder
The profile feeder feeds protocols to
the protocol feeder. You can load a profile with the profile feeder and run the
whole profile in real time.
Protocol
Feeder
The protocol feeder feeds frequency
pairs to the control panel. You can load a protocol with the protocol feeder
and run it in real time.
Control
Buttons
Provides controls to start, pause or
stop the running.
Parameters
Panel
Displays the parameters for the output
waveform. You can change the parameters in real time to change the output
waveform.
Pair
Run Time Control
Displays the run time of the current
running pair and the remaining time of current run pair. You can drag the
handle to increase or decrease the remaining time.
Protocol
Recorder
All the finished frequency pair of the
session will be recorded automatically in the Protocol Recorder. You can save
the finished protocol to a file for future use or reference.
5.3 Real Time Session Control
5.3.1 Real Time Work Flow
A brief work flow of using Real Time Control Panel is as the following:
- Start a new session,
- Change the parameters using the parameters panel,
- Finish the session, and save the recorded protocol.
5.3.2 To Start a Session
Click
on button  to start a new session. The panel will
search for a connected IS02BA machine and takes control of the IS02BA. When
connected, the current waveform will be started and the button will be changed
to PAUSE
to start a new session. The panel will
search for a connected IS02BA machine and takes control of the IS02BA. When
connected, the current waveform will be started and the button will be changed
to PAUSE  .
.
You may be asked whether to continue to use the protocol recorder for the new session. Click on YES to continue using the existing recorded protocol, i.e., the new protocol will be appended to the end of the existing finished protocol. Click NO to save the existing finished protocol in the recorder.
5.3.3 To Finish a Session
To
finish a session, you need to stop the current waveform by clicking on  .
The button will be changed to
.
The button will be changed to  ,
click on the button to finish the session.
,
click on the button to finish the session.
5.4 Run Profiles or Protocols
5.4.1 To Run a Profile in Real Time
To run a profile in Real Time Control Panel,
1. Open the profile with Profile Editor;
2. Use menu command Tools -> Run Profile in Real Time Control Panel.
The Real Time Control Panel will start and load the profile in the Profile Feeder of the panel.
5.4.2 To Run a Protocol in Real Time
To run a protocol in a profile in Real Time Control Panel,
1. Open the profile with Profile Editor;
2. Select the protocol to run, then right click and select Run Protocol in Real Time Control Panel.
The Real Time Control Panel will start if not started and load the protocol into the Protocol Feeder of the panel.
5.5 Make Real Time Changes to Output
When parameters of the waveform are changed, the output waveform will be changed in 3 seconds. You can change the delay time through Options.
5.5.1 Parameters Panels
There are different parameter panels for real time parameter setting. To switch the parameter panels, click on the drop down menu and select a panel.
5.5.1.1 Big Display Panel
Click on the highlighted digits to change the value of the digit. Click on the top half to increase the value, click on the bottom half to decrease the value. Or roll the mouse wheel forward or backward to increase or decrease the value.
5.5.1.2 Basic Panel
Change the values of the parameters; click the mouse to some blank area to apply the changes.
5.5.1.3 Waveform Panel
Change the values of the parameters; click the mouse to some blank area to apply the changes.
5.5.2 To Change Frequencies
|
Move the cursor to one of the digit of F1 or F2, the digit will be highlighted. Click on the top half of the digit to increase it by one, or bottom half to decrease by one. |
|

5.5.3 To Change Output Current
|
Move the cursor to one of the digit of output current, the digit will be highlighted. Click on the top half of the digit to increase it by one, or bottom half to decrease by one. |
|
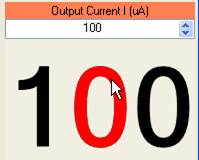
5.5.4 To Change Run Time
If the frequency pair comes from the feeding protocol in the Protocol Feeder, the pair will have the run time set in the protocol. You can add to reduce the run time of the pair.
![]()
- To add more time to the current running pair, drag the handle of the run time bar to the left, the remaining time will be increased.
- To reduce the remaining time to the current running pair, drag the handle of the run time bar to the right, the remaining time will be decreased.
5.6 Options
Click
on button ![]() to bring up the option window.
to bring up the option window.

Figure 26 Real Time Options
The
Real Time Control Panel will start with the default parameters set in the
option. To set the default parameters, first you set the parameters through the
parameter panels, then click Options button. In the Real Time Options window,
check the box ![]() ,
click OK to set the options. The parameters of the current waveform will be
used as the default values.
,
click OK to set the options. The parameters of the current waveform will be
used as the default values.
When a frequency or current is changed, the new settings will be used to run. The run time for this new setting can have three options:
- Fixed run time: The run time will always reset to the number of seconds in the option windows.
- Previous run time: for example, if the pair was to run 3 minutes, the new setting will run another 3 minutes.
- Remaining time: continue the previous settings, do not restart the timer. For example, if the previous pair has run for 1 minute out of the 3 minutes, the new settings will run for the remaining 2 minutes.
5.7 Communications
Click
on the Port text ![]() at the bottom left corner to bring up the
communication setup window.
at the bottom left corner to bring up the
communication setup window.
6
Protocol Encryption
6.1 About Protocol Encryption
Protocols can be encrypted by Protocol Author. Protocol Author is the person who composes the protocol and encrypts it. When a protocol is encrypted, all or part of the parameters of the protocol will not be shown to Protocol Users. Protocol Users are those persons who receive the encrypted protocols from Protocol Authors and want to use the protocols on their IS02 units. Protocol Users may need to provide authorization code obtained from Protocol Authors when they use the encrypted protocols. Authorization Code is the code or a USB key that is required to present when the encrypted protocol is going to written into IS02 units. Protocol Authors can choose the method of authorization.
Protocol Authors can share the encrypted protocols on their web site, by email, or on online forums.
6.2 To Encrypt Protocols
6.2.1 To Apply Encryption to Protocols
- Compose your protocols in Profile Editor; or load your existing protocols in Profile Editor or Protocol Editor.
- Click Encrypt Protocols in menu Encryption.
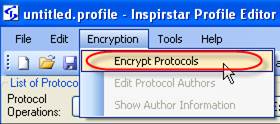
- Select an
existing author file, and enter the author password.
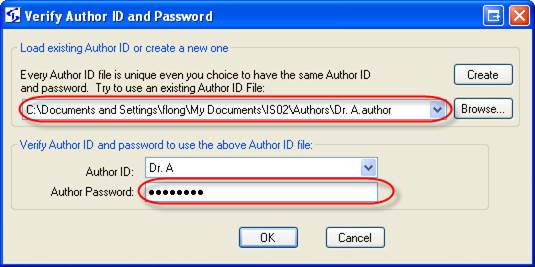
- If you don't have an author file, click Create to create a new author file. If you already have an author file, try to re-use that author file. Author files are unique even they have the same author ID and author password.
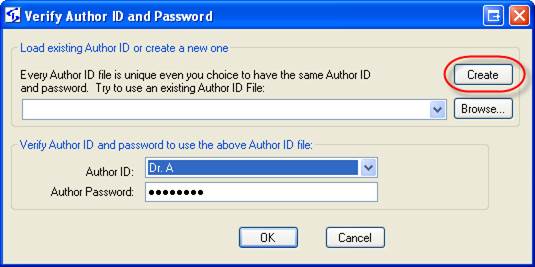
- Enter the author ID and password that you want to use, enter some author information for the users of your encrypted protocol, then save it into an author file.
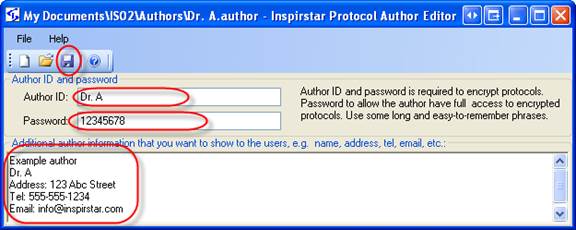
- The Protocol
Encryption window will pop up. Follow the 4 steps on the window.
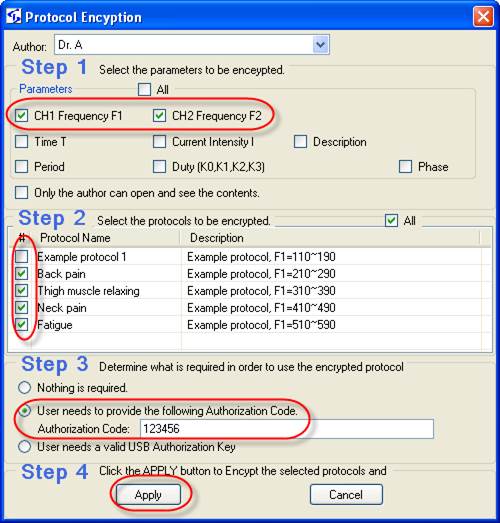
Step 1: select the parameters to be
encrypted.
Step 2: Select the
protocols that you want encrypt in the profile.
Step 3: Select the authorization method
from three options:
��
Nothing
is required. No authorization is required to use the encrypted protocols. Users
can write the protocol to IS02 although some information in the protocol is not
visible to them.
��
Use
Authorization Code: Users need to enter the authorization code in order to
write the protocols into IS02. Enter the authorization code in the box, and
send the code to the users of your encrypted protocols.
��
Use
Authorization Key: Users need the USB authorization key from you in order to
use the encrypted protocols. See section Error! Reference
source not found..
Step 4: Click button Apply. The selected
protocols will be encrypted.
6.2.2 To Remove Encryption from Encrypted Protocols
Only Protocol Authors can remove encryption from encrypted protocols.
- Follow the steps as in Apply Encryption to Protocols until you see the Protocol Encryption window.
- In the window, uncheck all parameters, select the protocols you want to remove the encryption, and select the authorization method to Nothing.
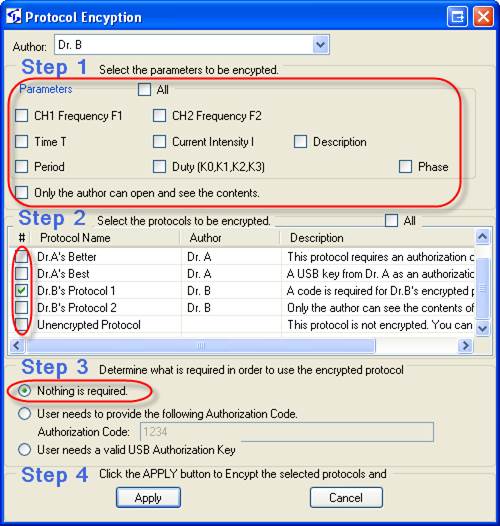
- Click Apply, you will be asked to confirm that the encryption will be removed. Click YES to remove the encryption.
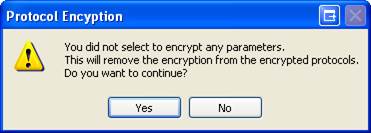
6.3 To Use Encrypted Protocols
Encrypted protocols can be added to a profile as normal protocols. All the operations to a normal protocol, such as copy, cut, paste, move up and down, import, and export, can be used on encrypted protocols. However, when you want to write the profile with encrypted protocols into IS02 unit, proper authorization is required.
- The profile with encrypted protocols will have two more columns than normal profile.

- Protocol 1 is encrypted but no Authorization Code is required. This protocol can be written into IS02 the same as unencrypted protocols.
- Protocol 2 is encrypted and an authorization code is required. Move the cursor to the column Authorization Code and enter the code.

Enter codes for other authors if there is
more than two authors.
- Protocol 3 is encrypted and a USB key is required. Plug into a spare USB port of the computer. The USB needs to be plugged when the Write process begins.
6.4 Authorization
6.4.1 To Distribute Authorization Code
Authorization Codes can be given to Protocol Users by all means, such as paper mails, emails, or over telephone. It��s the choice of the Protocol Authors.
6.4.2 To Distribute USB Authorization Keys
USB Authorization Keys can be purchased from Inspirstar. Contact sales@inspirstar.com for details.
The USB keys will be used to authorize for your author ID. The key is valid for all encrypted protocols that are encrypted by the same Author ID.
When you purchase the keys from Inspirstar, you need to provide your Author ID file. Inspirstar will associate the keys you purchased with your Author ID file. You will receive the USB keys and a key file. You need to give the USB key and the key file to your protocol users. Your protocol users need to copy the key file in to ��KeyFiles�� folder in the installed directory, by default it is ��C:\Program Files\Inspirstar\IS02\KeyFiles��; or the user data directory in ��My Documents\IS02\KeyFiles��. At your option, Inspirstar can put your key files in the software package so that your protocol users do need to copy the key file manually.
7
IS02 Remote Keypad
Inspirstar IS02 Remote Keypad allows you to use Windows PC to control a connected IS02. Note: this feature is not available on the old IS02BA models.
7.1 Start IS02 Remote Keypad
To start the Inspirstar Remote Keypad,
- In Profile Editor, select menu Tools -> IS02 Remote
Keypad. The Remote Keypad is in sharing connection mode.
- Or to use Windows Start menu -> Inspirstar -> Inspirstar Remote Keypad. The Remote Keypad is in standalone mode.
Both ways will start Inspirstar Remote
Keypad but there is slight difference on how the connection can be shared
between Remote Keypad and Profile Editor. When in sharing connection mode, the
Profile Editor can still read/write to IS02 when Remote Keypad is connected to
IS02. When in standalone mode, the Profile Editor can��t access to the same IS02
unit that is under control of Remote Keypad.
7.2 Remote Keypad Window Layout
Inspirstar Remote Keypad shows the keypad for IS02PRO by default before connection to IS02 is made.
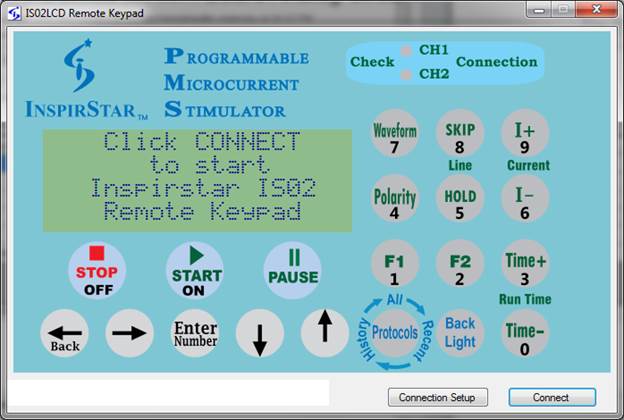
Click on Connect button to make connection to the IS02
or IS02 connected to USB port. Once connected, the keypad will be changed to the
same keypad layout as the connected IS02 model.
7.3 Operate with Remote Keypad
After connected to IS02, the Remote Keypad can be used to see the LCD information and to control the operation of IS02.
- LCD window will display the same message as on IS02.
- You can click on the keys on the keypad image to operate the IS02. You can also press the keys on actual IS02 keypad. Both ways will have the same effects.
- The CH1/CH2 connection LED on Remote keypad is not going to be flashed when the actual LEDs on IS02 are flashing.
NOTE
Hold down the mouse button when clicking on the keys on the screen to emulate the Hold and Repeat operation of the physical keys on IS02 devices.
After connected, the IS02 unit will not power off. You need to disconnect Inspirstar Remote Keypad to allow IS02 unit to be able to power off.
7.4 Connection to IS02
By default, Inspirstar Remote Keypad will detect connected IS02 units. When you have more than one IS02 connected to PC USB ports, you may want to specify the port of connection so you can control the exact unit through Inspirstar Remote Keypad.
Click
the ![]() button on the Remote Keypad to
bring up the connection setup window as below, select the port of IS02 and click
button on the Remote Keypad to
bring up the connection setup window as below, select the port of IS02 and click
![]() button. The model name and serial
number of the detected IS02 unit will be shown on the dialog. Change the port
number if this is not the unit you want to control.
button. The model name and serial
number of the detected IS02 unit will be shown on the dialog. Change the port
number if this is not the unit you want to control.
8
Questions and Answers
8.1 How to restore Inspirstar IS02 to its factory default profile?
Inspirstar
IS02 will be restored back to its factory profile if you write a blank user
profile to it with a blank password, i.e. entering nothing in the password box.
The blank user profile is a new profile that has no frequency pairs in all the
five protocols.
8.2 What to do if I forgot the password?
You
can restore the IS02 to its factory default. See ��8.1 How to restore Inspirstar IS02 to its
factory default profile?�� However, you will lose your
previous user profile in Inspirstar IS02. If you have the profile for that
unit, you can open the profile to get the password if you had selected to save
the password in the profile.
8.3 How to print a profile?
You
can print the profile with the Print command in File menu of Profile Editor, or
print a protocol with the Print command in Protocol Editor.
8.4 Can two channels run in different period and phase?
It
depends on how the two channels are used.
1.
The two channels are connected to only one pair of gloves.
In
this case, one electrode (glove) is connected to the positive terminals of both
channels, i.e. the two buttons on the glove are connected to the one phone jack
of Inspirstar IS02. This connection will effectively short the two positive
terminals together. So the two channels must be running in same period, same
polarity and same phase, in another word, the two channels run synchronously.
In this mode, there are only two effective terminals for two channels.
2.
The two channels are connected to four electrodes.
The
four electrodes can two pairs of gloves, or other means of electrodes. In this
case, the positive and negative electrodes of one channel are separated from
the electrodes of the other channel. The two channels are totally independent
so they can run in different period, polarity and phase.
Inspirstar
IS02 and Inspirstar IS02 Profile Editor do not know the external connection you
desire to use. There will be no warning if the period and phase are different
for the two channels. You might not get what you want if the connection does
not meet the requirement of the protocol.
8.5 Can two channels run in different current intensity?
Yes,
the two channels can have different current intensity and wave form duty
cycles, no matter if the two channels are used with two electrodes (gloves) or
four electrodes. However, the period, polarity and phase depends on the
application, see ��8.4 Can two channels run in different period
and phase?�� for more details.
8.6 How to turn off the modulating frequency?
The
modulating frequency F1 and F2 will be turned off when the frequency is set to
0 Hz.
8.7 How to turn off one channel?
The
channel output current will be turned off when the therapy time (T1 or T2) of
the channel is set to 0 minutes. Note that you need to use Advanced Parameters
page to set T1 and T2 separately.
8.8 How to change the period for all frequency pairs in a protocol?
Global
Change tool is for making changes to part of or all frequency pairs in the
profile. See ��4.6.4 Using Global Change�� for more details.

Inspirstar Inc.
Address: 333 N. Dobson
Rd, Suite 5, Chandler, AZ 85224
Phone: 480-634-8708 Fax: 480-634-8982
Technical Support:
Web site: http://www.inspirstar.com
Email: support@inspirstar.com
© 2005-2023 Inspirstar Inc. All rights reserved. Inspirstar and the IS logo are the trademarks of Inspirstar Inc. Trademarks or registered trademarks are the property of their respective holders. Software and specifications are subject to change without notice.